Built-In Kitchen Plate Racks: Complete Installation Guide 2026
Did you know that built-in kitchen plate racks can increase your kitchen storage efficiency by up to 40% while creating a sleek, organized appearance? Modern homeowners are increasingly choosing integrated storage solutions that maximize space while maintaining aesthetic appeal.

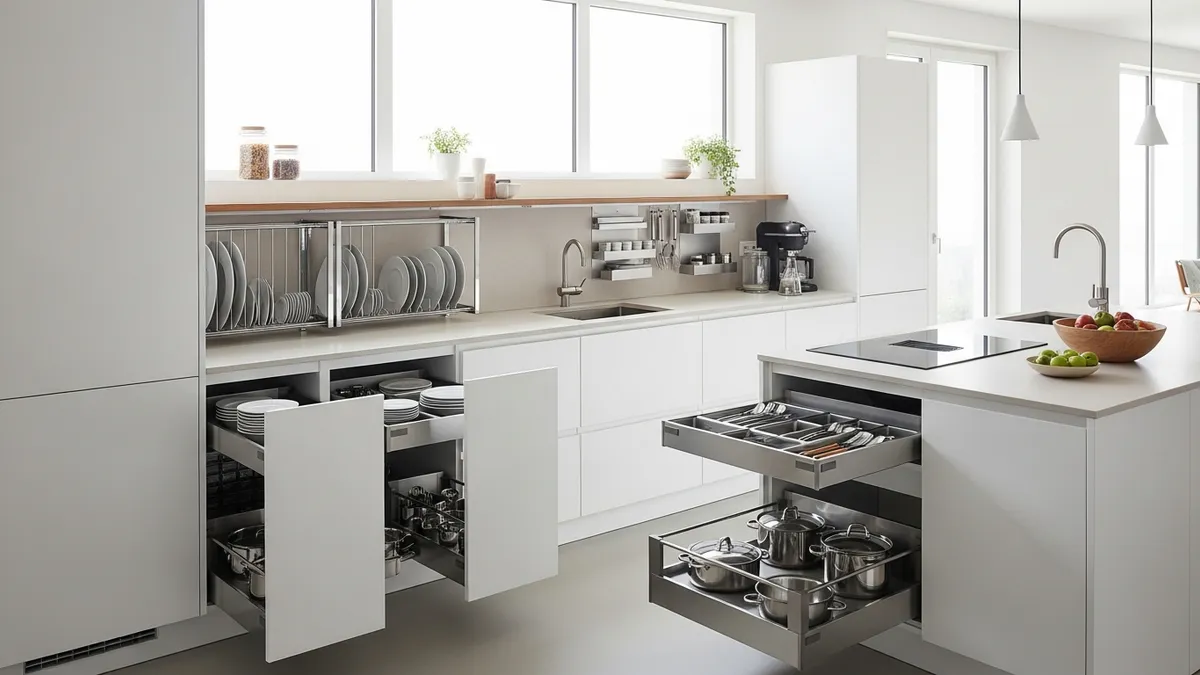
Installing rak piring kitchen set (built-in plate racks) transforms cluttered cabinets into organized, accessible storage systems. Whether you're renovating an existing kitchen or designing a new one, understanding the different types, installation requirements, and best practices ensures optimal results.
In this comprehensive guide, you'll learn everything about selecting, installing, and maintaining built-in plate rack systems that perfectly complement your kitchen design while maximizing functionality. From pull-out mechanisms to lift-up systems, we'll cover every aspect of creating efficient dish storage.
Why Built-In Kitchen Plate Racks Are Essential
Built-in rak piring kitchen set solutions offer numerous advantages over traditional cabinet shelving. These systems provide better organization, easier access, and enhanced kitchen workflow efficiency.
Space Optimization Benefits:
- Maximize vertical cabinet space with tiered storage
- Eliminate wasted space between shelves
- Accommodate various plate sizes simultaneously
- Create designated spots for different dish types
Accessibility Improvements:
- Pull-out mechanisms bring dishes to you
- Eliminate reaching into deep cabinets
- Reduce risk of dropping or breaking dishes
- Enable easy cleaning and maintenance
According to kitchen design experts, integrated storage solutions like built-in plate racks increase kitchen functionality by 35% while maintaining clean aesthetic lines. The investment in quality rack systems typically adds value to your home while improving daily cooking experiences.
Types of Built-In Plate Rack Systems
Understanding different rak piring kitchen set mechanisms helps you choose the best solution for your specific needs and cabinet configurations.
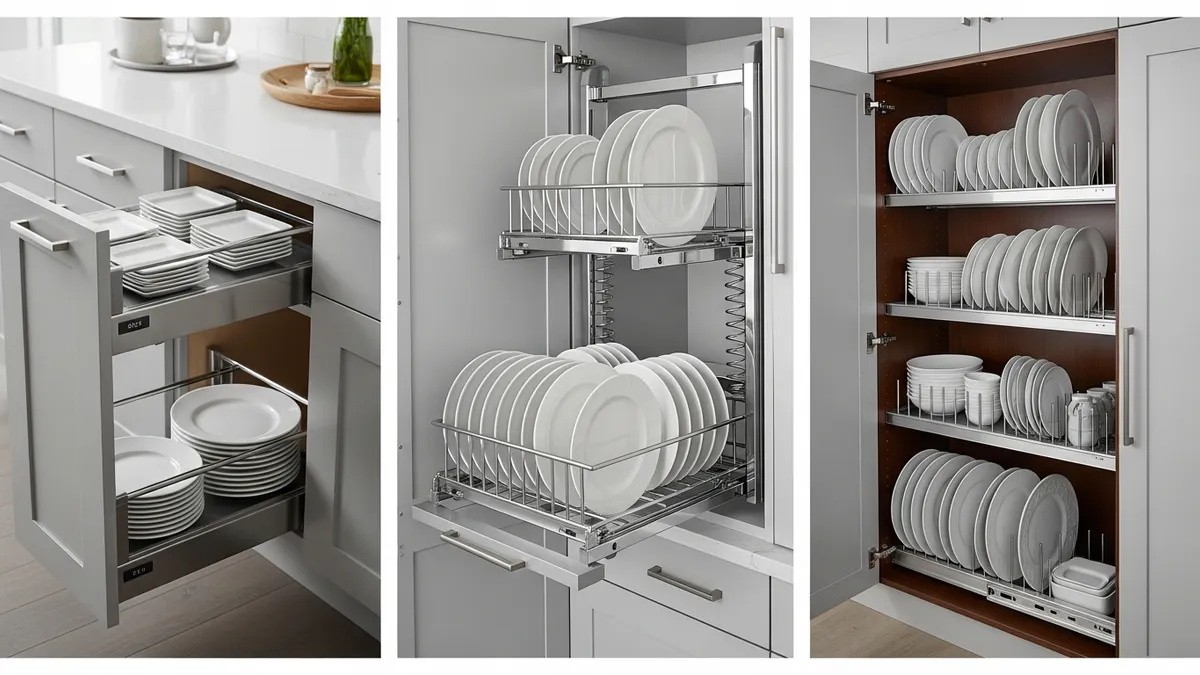
Pull-Out Drawer Systems
Pull-out plate racks function like traditional drawers but feature specialized compartments for dishes. These systems work exceptionally well in base cabinets and provide excellent accessibility.
Key Features:
- Full-extension drawer slides for complete access
- Adjustable dividers for different plate sizes
- Soft-close mechanisms prevent slamming
- Weight capacity typically 44-66 pounds
Lift-Up Mechanisms
Lift-up plate racks utilize vertical cabinet space efficiently by raising dish storage upward when accessed. These systems work particularly well in upper cabinets.
Advantages:
- Maximize upper cabinet storage
- Bring high shelves within easy reach
- Ideal for frequently used dishes
- Space-saving design for compact kitchens
Sliding Track Systems
Sliding plate racks move horizontally on tracks, allowing access to dishes stored in cabinet depths. This system works well for corner cabinets and deep storage areas.
For premium kitchen organization solutions, explore our Collections featuring various built-in storage systems designed for modern homes.
Materials and Tools Required
Successful rak piring kitchen set installation requires proper materials and tools. Quality components ensure long-lasting performance and smooth operation.
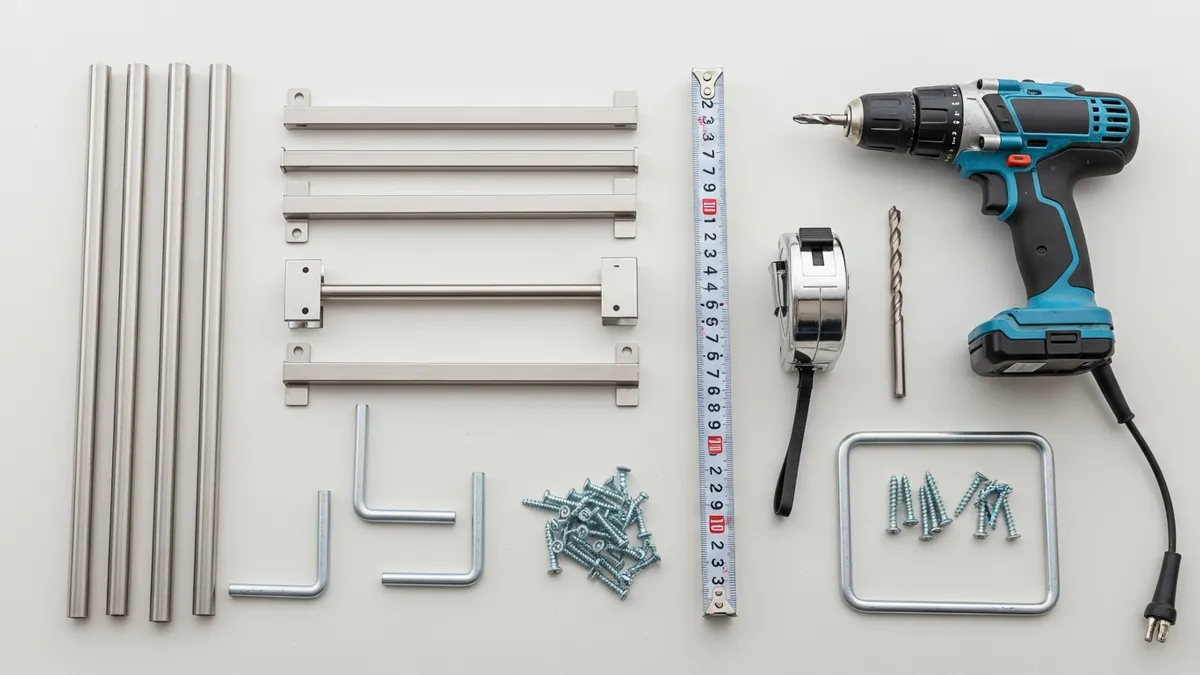
Essential Materials:
- Stainless steel or aluminum rack framework
- Heavy-duty drawer slides (soft-close recommended)
- Mounting brackets and hardware
- Adjustment screws and leveling components
- Food-safe coating materials
Required Tools:
- Drill with various bit sizes
- Measuring tape and level
- Screwdriver set
- Pencil for marking
- Safety glasses and gloves
Material Quality Considerations:
Choose food-grade stainless steel for durability and hygiene. Stainless steel resists corrosion, maintains appearance over time, and supports heavy dish loads. Our guide on caring for stainless steel kitchen equipment provides maintenance tips for longevity.
Quality materials typically cost $150-400 per cabinet, depending on size and mechanism complexity. Investing in premium components ensures smooth operation and extends system lifespan significantly.
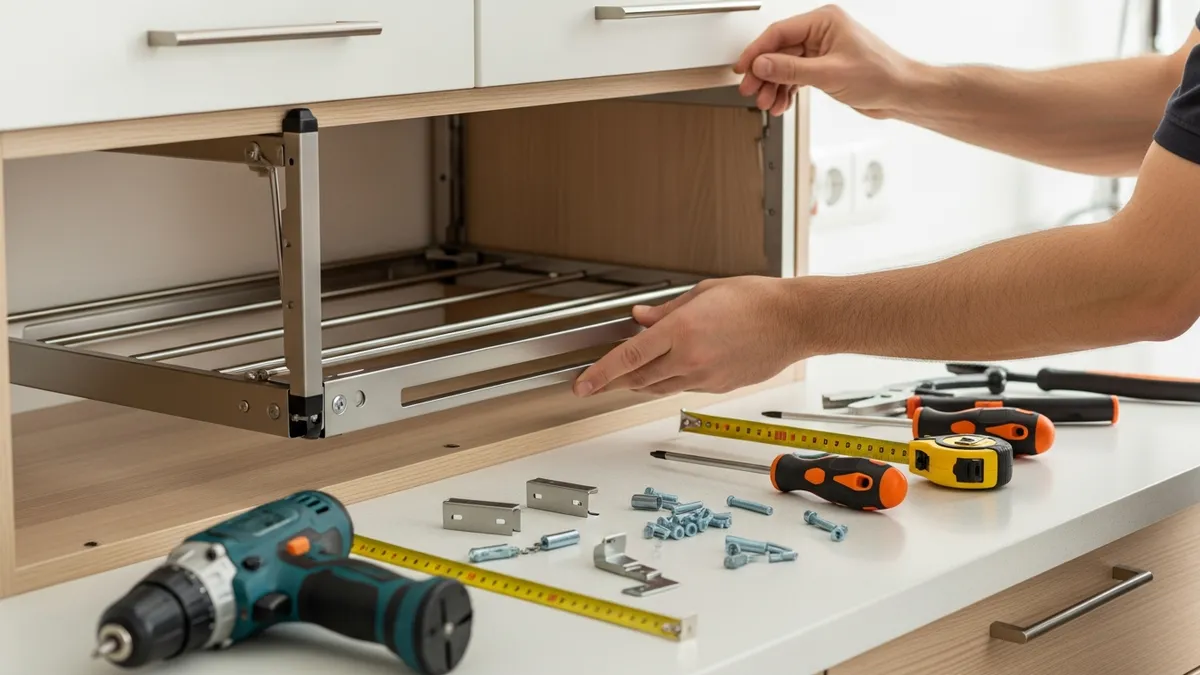
Step-by-Step Installation Process
Installing rak piring kitchen set requires careful planning and precise execution. Follow these detailed steps for professional results.
Phase 1: Planning and Measurement
1. Measure Cabinet Dimensions
Record internal cabinet width, depth, and height accurately. Account for door hinges, existing hardware, and electrical components that might interfere with installation.
2. Determine Rack Configuration
Plan plate arrangement based on your dishware collection. Consider dinner plates, salad plates, bowls, and serving dishes when designing compartment sizes.
3. Mark Installation Points
Use a pencil and level to mark drill holes and mounting points. Double-check measurements before drilling to avoid costly mistakes.
Phase 2: Hardware Installation
4. Install Mounting Brackets
Secure brackets to cabinet sides using appropriate screws for your cabinet material. Ensure brackets are level and properly aligned for smooth operation.
5. Mount Drawer Slides
Install heavy-duty slides according to manufacturer specifications. Test slide operation before proceeding to ensure smooth movement.
6. Attach Rack Framework
Connect the plate rack system to installed hardware. Verify all connections are secure and adjust as needed for proper alignment.
Phase 3: Testing and Adjustment
7. Load Test System
Gradually add weight to test system capacity and smooth operation. Make adjustments to eliminate binding or uneven movement.
8. Fine-Tune Alignment
Adjust rack positioning for optimal plate access and storage efficiency. Ensure adequate clearance for different dish sizes.
Expert Tips for Optimal Results
Professional installers share these essential tips for rak piring kitchen set success:
Pre-Installation Preparation:
- Remove all cabinet contents and clean thoroughly
- Check cabinet structural integrity before installation
- Ensure adequate lighting for precise work
- Have a helper available for handling large components
Installation Best Practices:
- Use appropriate drill bits for your cabinet material
- Pre-drill holes to prevent wood splitting
- Apply thread-locking compound to prevent screw loosening
- Test-fit all components before final installation
Quality Assurance:
- Verify smooth operation throughout full travel range
- Check weight distribution and load capacity
- Ensure adequate clearance for cabinet doors
- Apply food-safe lubricant to moving parts
According to kitchen renovation experts, proper installation techniques extend system life by 50% compared to rushed installations. Taking time for precise measurement and careful installation pays dividends in long-term performance.
Common Installation Mistakes to Avoid
Learning from common errors saves time, money, and frustration when installing rak piring kitchen set systems.
Measurement Errors:
- Failing to account for cabinet door thickness
- Ignoring existing plumbing or electrical obstacles
- Not measuring diagonal distances in older cabinets
- Overlooking hinge clearance requirements
Hardware Issues:
- Using inadequate screws for cabinet material
- Skipping pre-drilling in hardwood cabinets
- Over-tightening screws and stripping holes
- Installing slides without proper alignment
Operational Problems:
- Overloading rack systems beyond capacity
- Ignoring manufacturer weight limits
- Failing to test smooth operation before completion
- Not allowing adequate settling time
Discover professional-quality storage solutions at Sesoris to avoid common installation pitfalls with premium, well-designed systems.
Cost Analysis and Timeline
Understanding rak piring kitchen set investment helps budget appropriately for your kitchen upgrade project.
Material Costs (Per Cabinet):
- Basic pull-out system: $120-200
- Premium soft-close system: $200-350
- Custom lift-up mechanism: $250-450
- Professional installation: $100-150 per cabinet
DIY Installation Timeline:
- Planning and measurement: 2-3 hours
- Hardware installation: 3-4 hours per cabinet
- Testing and adjustment: 1-2 hours
- Total project time: 6-9 hours per cabinet
Professional Installation Benefits:
Professional installation ensures warranty coverage, proper alignment, and optimal performance. Many homeowners choose professional installation for complex systems or multiple cabinets to ensure consistent results.
Long-term Value:
Quality built-in plate racks typically last 15-20 years with proper maintenance. The improved kitchen functionality and storage efficiency justify the initial investment through enhanced daily cooking experiences.
Browse our Best Sellers for proven storage solutions that combine quality construction with competitive pricing.
Maintenance and Longevity
Proper maintenance ensures your rak piring kitchen set systems operate smoothly for years while maintaining their appearance and functionality.
Regular Maintenance Tasks:
- Clean tracks and slides monthly with damp cloth
- Lubricate moving parts every 6 months
- Tighten hardware connections annually
- Inspect for wear or damage during routine cleaning
Deep Cleaning Procedures:
- Remove racks quarterly for thorough cleaning
- Use mild soap and warm water for stainless steel components
- Avoid abrasive cleaners that scratch surfaces
- Dry completely before reassembly
Troubleshooting Common Issues:
- Sticky operation: Clean tracks and apply lubricant
- Uneven movement: Check bracket alignment
- Excessive noise: Tighten loose hardware
- Reduced capacity: Inspect for wear or damage
Pro Tip: Keep spare hardware and lubricant on hand for quick maintenance. Regular care prevents major repairs and extends system life significantly.
FAQ: Built-In Kitchen Plate Rack Systems
Q: What cabinet dimensions work best for built-in plate racks?
Standard base cabinets (24-inch depth) accommodate most pull-out systems easily. Minimum width of 15 inches ensures adequate plate storage, while 18-24 inch widths optimize capacity and accessibility.
Q: Can I install plate racks in existing cabinets?
Yes, most existing cabinets accommodate retrofit installation. However, older cabinets may require reinforcement or modification for optimal performance. Professional assessment ensures compatibility.
Q: How much weight can built-in plate racks support?
Quality systems support 44-66 pounds when properly installed. This accommodates typical dish collections for families of 4-6 people. Always verify manufacturer specifications for your specific system.
Q: Do built-in racks work with all plate sizes?
Adjustable dividers accommodate various plate diameters from 6-12 inches. Custom systems can handle specialty serving pieces and unique dishware collections with proper planning.
Q: What's the best material for plate rack construction?
Food-grade stainless steel offers optimal durability, hygiene, and appearance retention. Aluminum provides lighter weight options, while coated steel offers budget-friendly alternatives with good performance.
Conclusion
Installing rak piring kitchen set systems transforms kitchen storage efficiency while creating organized, accessible dish storage. Whether choosing pull-out drawers, lift-up mechanisms, or sliding tracks, proper planning and installation ensure years of reliable performance.
The investment in quality built-in plate racks pays dividends through improved kitchen functionality, better organization, and enhanced cooking experiences. With proper materials, careful installation, and regular maintenance, these systems provide lasting value for modern homes.
Ready to upgrade your kitchen storage? Explore Sesoris for premium storage solutions designed to organize your life with ease. Our curated collection features professional-quality systems that transform kitchens into efficient, beautiful spaces.
Weekly Home Tips
Get home organization ideas, product picks, and exclusive deals delivered weekly.
No spam. Unsubscribe anytime.