
How to Build DIY Garage Shelves: Complete Step-by-Step Guide for 2026
Learn how to build sturdy DIY garage shelves with our step-by-step 2026 guide. Save money, maximize space, and organize your garage today!

If your garage has become a dumping ground for everything from holiday decorations to power tools, building your own diy garage shelves might be the single best weekend project you tackle in 2026. Custom-built shelves give you exactly the dimensions, strength, and style you need at a fraction of what pre-made shelving systems cost. I have built several sets of garage shelves over the years, and I can tell you firsthand that the process is more approachable than most people think. Whether you are a seasoned DIYer or picking up a drill for the first time, this complete step-by-step guide will walk you through every phase of planning, cutting, assembling, and finishing your own garage shelving.
Table of Contents
- Why DIY Garage Shelves Are Worth Building in 2026
- Planning Your DIY Garage Shelves
- Materials and Tools You Need
- Step-by-Step Instructions
- How to Maximize Your New Shelves
- FAQ: Frequently Asked Questions
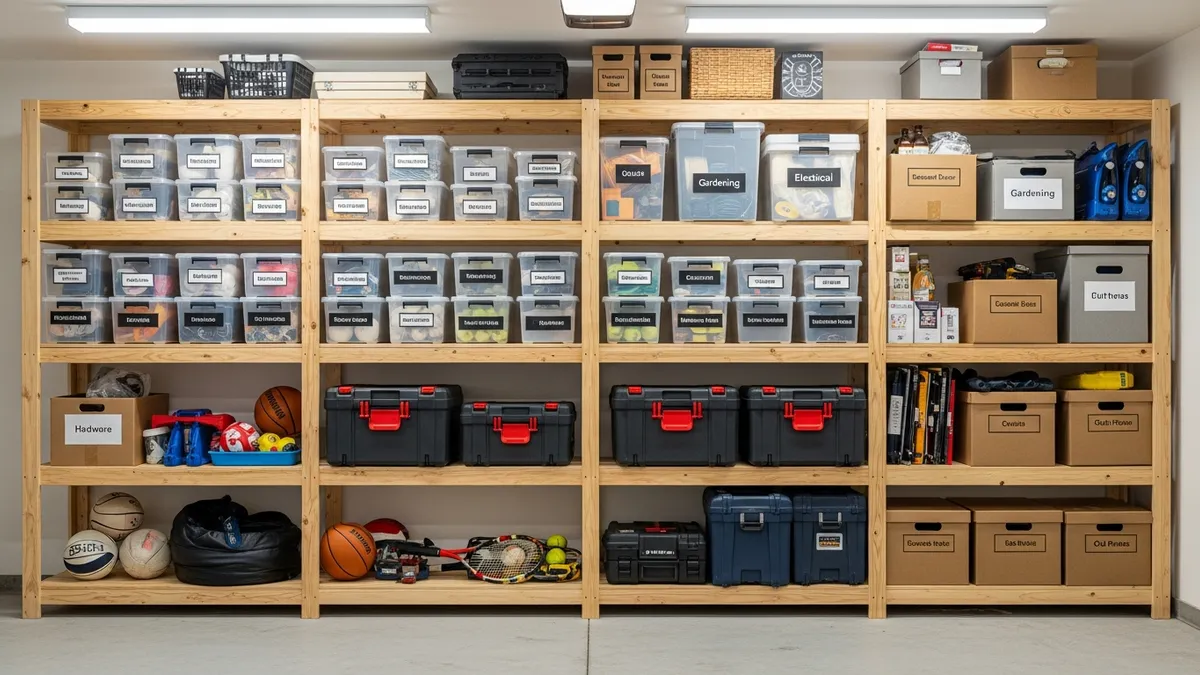
Why DIY Garage Shelves Are Worth Building in 2026
The garage is one of the most underutilized storage spaces in the average American home. According to This Old House's DIY garage shelf guide, a well-organized garage can effectively double your usable storage capacity without adding a single square foot to your home. Pre-built metal shelving units are convenient, but they often come in fixed sizes that leave awkward gaps, cannot support heavy loads as reliably as custom lumber builds, and tend to cost significantly more when you need multiple units.
Building your own diy garage shelves lets you:
- Customize dimensions to fit your exact wall length, ceiling height, and storage needs
- Choose load capacity by selecting thicker plywood and closer stud spacing for heavy bins and tools
- Save money by using standard dimensional lumber available at any home improvement store
- Match your layout so shelves fit around garage doors, windows, and utility panels
- Build in phases and expand the system over time as your storage needs grow
For more inspiration before you start building, check out our roundup of 25+ Best DIY Garage Storage Ideas to Transform Your Space in 2026 and our guide to Best Garage Storage Solutions: Transform Your Space into an Organized Haven in 2026.
Planning Your DIY Garage Shelves: Measurements, Layout, and Load
Good planning is the difference between shelves that serve you for decades and shelves that wobble, sag, or run out of space in six months. Before you buy a single board, spend 30 minutes mapping out your build.
Step 1: Measure Your Garage Wall
Use a tape measure to record the full width of the wall you plan to use, the height from floor to ceiling, and the depth you want your shelves to be. Standard garage shelves are typically 16 inches deep for lighter items or 24 inches deep for bulky bins and equipment. Most builders aim for a total height of 7 to 8 feet to stay below the garage door track while maximizing vertical space.
Step 2: Decide on Shelf Spacing
Think carefully about what you will be storing on each shelf. Common spacing guidelines for garage shelving are:
- 12 inches between shelves for smaller items like paint cans and hand tools
- 16 to 18 inches for standard plastic storage bins
- 20 to 24 inches for large totes, seasonal gear, and power tool cases
- One tall open section at least 36 inches high for lawn equipment handles or sporting goods
Step 3: Locate Your Wall Studs
Wall-mounted shelves must be anchored into studs for safety. Use a stud finder to locate every stud along your target wall and mark each one lightly with a pencil. In most American homes, studs are spaced 16 inches apart on center. Knowing stud locations now will save you enormous frustration during assembly.
Step 4: Choose Your Build Style
There are two primary designs for diy garage shelves:
- Wall-mounted shelves attach directly to studs, freeing up floor space and making the garage easier to sweep
- Freestanding shelving units stand on their own and can be repositioned, making them ideal for renters or garages with uneven walls
This tutorial covers the freestanding box-frame design, which is the most popular choice for American homeowners because it is incredibly sturdy, beginner-friendly, and can be built without specialized tools.
Materials and Tools You Need to Build DIY Garage Shelves
One of the biggest advantages of building your own shelves is that the materials are inexpensive and universally available. Here is a standard materials list for a freestanding unit that is 8 feet wide, 7 feet tall, and 24 inches deep with five shelves.
Lumber
- 2x4 lumber (standard dimensional, 8-foot lengths) for the vertical uprights and horizontal front and back rails
- 3/4-inch plywood (4x8 foot sheets) for the shelf decking
Always ask your home improvement store to make your first rough cuts on their panel saw if you do not own a circular saw. Most stores do this for free or for a small fee.
Hardware
- 3-inch wood screws (coarse thread, exterior rated to resist rust in humid garages)
- 1-5/8-inch screws for attaching plywood decking to the frame
- L-brackets if you plan to anchor the top of the unit to a wall stud for anti-tip safety
Tools
- Circular saw or miter saw
- Power drill and driver bits
- Tape measure
- Carpenter's square
- 4-foot level
- Pencil
- Safety glasses and ear protection
You do not need anything exotic. If you are missing a saw, most tool rental centers at home improvement stores rent circular saws by the day at a very reasonable rate.
Step-by-Step Instructions for Building Freestanding DIY Garage Shelves
With your plan finalized and your materials on hand, it is time to build. Work methodically and double-check your measurements at each stage.
Step 1: Cut All Your Lumber
Cut your 2x4s to the following pieces for an 8-foot-wide, 7-foot-tall, 24-inch-deep unit:
- Four vertical uprights at 84 inches (7 feet) each
- Ten horizontal rails at 93 inches each (for front and back of each of the five shelf levels)
- Ten side rails at 21 inches each (to account for the 3-inch width of the 2x4 uprights on each end, giving you a true 24-inch depth)
Cut your plywood sheets into five shelf decking pieces at 96 inches by 24 inches.
Step 2: Build Two Side Ladder Frames
Each side frame consists of two vertical uprights connected by the side rails at the correct shelf heights. Lay two uprights flat on the garage floor, parallel to each other. Position your five side rails at the shelf heights you planned and drive two 3-inch screws through each joint. Build two identical side frames.
Pro tip: Pre-drill pilot holes before driving screws near the ends of boards. This prevents the wood from splitting and gives you a much cleaner, stronger joint.
Step 3: Stand Up the Side Frames and Connect Them
Stand both side frames upright and have a helper hold them in position while you attach the ten front and back horizontal rails. Connect each rail to the uprights with two 3-inch screws per joint. Work from the bottom shelf up, checking that each rail is level before moving on.
Step 4: Lay and Fasten the Plywood Decking
Drop each plywood shelf deck into position and fasten it to the rails underneath using 1-5/8-inch screws every 12 inches along the front, back, and any middle rails. The plywood adds enormous rigidity to the whole structure.
Step 5: Check for Square and Level
Use your 4-foot level to confirm that the unit stands plumb on all sides. If the unit rocks, slip shims under the low legs until it sits flat. If a wall stud is available nearby, anchor an L-bracket from the top rear rail into the stud for anti-tip security, which is especially important if children have access to the garage.
Step 6: Sand Rough Edges and Apply a Finish (Optional)
Lightly sand any splintery edges with 80-grit sandpaper. For a cleaner look and extra moisture resistance, you can paint the unit with a coat of oil-based primer followed by a latex paint in any color you choose. White is by far the most popular choice because it brightens the garage and makes it easy to spot items on the shelves.
How to Maximize Your New DIY Garage Shelves with Smart Organization
Building the shelves is only half the project. How you load and label them determines whether your garage stays organized for years or descends back into chaos within weeks. According to Good Housekeeping garage organization advice, the most common reason garages become disorganized again is the absence of a clear zone system.
Here are the organizing principles I follow after every garage shelf build:
Create Dedicated Zones
Assign each shelf or shelf section to a specific category. Common garage zones include:
- Automotive (oils, washer fluid, tire pressure gauge)
- Seasonal decorations (holiday bins stacked on the highest shelf)
- Lawn and garden (fertilizer, seeds, small hand tools)
- Sports and recreation (balls, helmets, camping gear)
- Hardware and tools (fasteners, adhesives, sandpaper)
- Household overflow (paper towels, cleaning supplies, extra pantry items)
Use Uniform Storage Bins
Matching bins stack cleanly, maximize vertical space within each shelf bay, and look far more organized than a collection of mismatched boxes. Clear bins let you see contents at a glance. Sesoris carries a range of home organization products that work beautifully on garage shelves.
Label Everything
Labels are the single habit that keeps a garage organized long term. Use a label maker or printed adhesive labels on the front face of every bin. For shelf edges, consider a label strip that identifies what belongs in each section even when the shelves are empty.
Keep Heavy Items Low
Always store your heaviest items on the bottom two shelves. This lowers the center of gravity of the unit, reduces strain when lifting, and makes the shelves safer overall.
For more ideas on what to store and how to arrange your space, browse our collection of 25+ Best Garage Bike Storage Ideas and 20+ Best Garage Shoe Storage Ideas.
Common Mistakes to Avoid When Building DIY Garage Shelves
Even experienced builders make mistakes on garage shelving projects. Here are the most common pitfalls and exactly how to avoid them.
Using Lumber That Is Too Thin
The most frequent beginner mistake is using 1x4 or 1x6 boards for the frame instead of 2x4s. Thin boards flex and sag under the weight of full storage bins. Always use 2x4s for the structural frame and at least 3/4-inch plywood for the decking on a garage shelving unit intended for heavy storage.
Skipping the Level Check
Shelves that are even slightly out of level will cause bins to slide, doors to not close properly, and the whole unit to rack out of square over time. Check level at every shelf during assembly, not just at the end.
Ignoring the Floor
Garage floors are rarely perfectly flat. If you set a shelving unit on an uneven floor without shimming the low corners, the unit will rock and eventually rack. Always shim before you call the build complete.
Overloading Upper Shelves
Even a well-built unit has limits. A sheet of 3/4-inch plywood supported every 48 inches can handle substantial weight, but heavy concentrated loads on upper shelves raise the center of gravity dangerously. Distribute weight evenly and keep the heaviest items low.
Not Anchoring to the Wall
Freestanding units should still be anchored to at least one wall stud via an L-bracket at the top for anti-tip protection. This is particularly critical in garages where children are present or where the unit will hold particularly heavy items at height.
DIY Garage Shelves vs. Store-Bought Options: Which Is Right for You?
This is the question I get asked most often, and the honest answer is that it depends on your specific situation. Here is a straightforward comparison to help you decide.
When to Build Your Own
- You have a non-standard wall width that pre-made units cannot span
- You want maximum load capacity for heavy tools and equipment
- You enjoy woodworking and want a weekend project
- You are working with a tight budget and have access to basic tools
- You want shelves that match a specific aesthetic
When to Buy Pre-Made
- You need shelves installed this weekend without any tool time
- You are renting and cannot make permanent modifications
- You only need light-duty storage for smaller items
- You want metal wire shelving for visibility and airflow
For pre-made garage storage options, check out our Garage Storage Solutions Costco: Complete Review & Buying Guide 2026 and Garage Storage Solutions Near Me: Complete Review & Buying Guide for 2026.
You can also find helpful inspiration for combining DIY builds with purchased accessories in Houzz's garage organization guide, which covers shelving, storage bins, and wall-mounted rail systems.
Related Products from Sesoris
If you want to turn this guide into a real setup, start with Stackable Storage Bins, 24 Pack and Pull-Out Cabinet Organizer, 17 in. Wide. For broader options, browse the Home & Decor collection so the article journey does not stop at reading only.
Our practical rule: choose one product that solves the main clutter problem first, then add supporting organizers only when the daily workflow is already clear. This keeps the shopping path useful, not pushy.
FAQ: Frequently Asked Questions About DIY Garage Shelves
Q: How much weight can DIY garage shelves hold?
A properly built freestanding unit using 2x4 framing and 3/4-inch plywood decking with supports every 48 inches can typically hold 200 to 400 pounds per shelf, depending on how the load is distributed. Always spread weight evenly and avoid concentrating heavy loads in the center of a span.
Q: What is the best wood for DIY garage shelves?
Standard construction-grade 2x4 pine or fir is the most popular and cost-effective choice for the frame. For the shelf decking, 3/4-inch plywood (either OSB for budget builds or sanded plywood for a cleaner finish) works extremely well. Avoid particle board or MDF in garages as they absorb moisture and lose strength over time.
Q: How deep should garage shelves be?
16 inches deep works well for paint cans, hand tools, and smaller bins. 24 inches deep is the most popular choice because it fits standard large storage totes perfectly. Avoid going deeper than 24 inches unless you have a specific reason, as it becomes difficult to reach items at the back.
Q: Do I need to anchor freestanding garage shelves to the wall?
It is strongly recommended. Even a well-balanced freestanding unit can tip forward if someone pulls heavily on an upper shelf or if a child climbs on the lower shelves. A single L-bracket secured to a wall stud at the top of the unit is an inexpensive insurance policy against tipping.
Q: How long does it take to build DIY garage shelves?
Most first-time builders complete a standard 8-foot-wide, 5-shelf unit in a single weekend. Saturday for planning, buying materials, and making cuts. Sunday for assembly, leveling, and loading. Having a helper speeds the process significantly, especially for standing up the side frames.
Q: Can I build garage shelves without a saw?
Yes, with a little planning. Most large home improvement stores will make straight cuts on lumber and plywood for a small fee or even for free. Bring your cut list with exact dimensions and they can prepare everything before you load it in your vehicle.
Conclusion
Building your own diy garage shelves is one of the most rewarding home improvement projects you can tackle in 2026. For the cost of a few sheets of plywood and some dimensional lumber, you get a fully customized, heavy-duty storage system that perfectly fits your garage and your life. The process is straightforward, the tools required are minimal, and the results are dramatically better than most off-the-shelf alternatives. Once your shelves are up, load them with uniform bins, label everything clearly, and commit to putting items back in their designated zones after every use. That one habit is what separates a garage that stays organized from one that slowly reverts to chaos.
Ready to take your garage organization even further? Explore the full range of home and garage organization solutions at Sesoris and browse our Best Sellers for the storage bins, labels, and organizing accessories that pair perfectly with your new shelves. You can also check out our New Arrivals for the latest home organization products designed to help you live more organized.
Liked this guide?
Get new organizing guides and the occasional new product by email. No spam, unsubscribe anytime.
Related articles



Explore more articles
- Glass Food Storage Containers with Lid: The Ultimate 2026 Review & Buying Guide
- Best Storage for Clothes: 25+ Smart Solutions to Organize Your Wardrobe in 2026
- Organizing Children's Closet: The Complete 2026 Guide to a Tidy, Kid-Friendly Wardrobe
- 30+ Best Laundry Room Shelving Ideas to Maximize Every Inch in 2026
- 30+ Best Bathroom Cabinet Ideas to Maximize Every Inch of Your Space in 2026
- How to Declutter Your House: The Complete 2026 Room-by-Room Guide
- Tool Storage & Organization: The Complete 2026 Guide to a Clutter-Free Garage & Workshop
- 25+ Best Small Space Organization Hacks to Maximize Every Inch of Your Home in 2026