
Craft Room Storage Cabinets: Types, Layouts and How to Organize Them
A guide to craft room storage cabinets: which cabinet type suits fabric, paper, yarn and small supplies, how to organize the inside, rolling cabinets, wall storage and anchoring tall pieces.
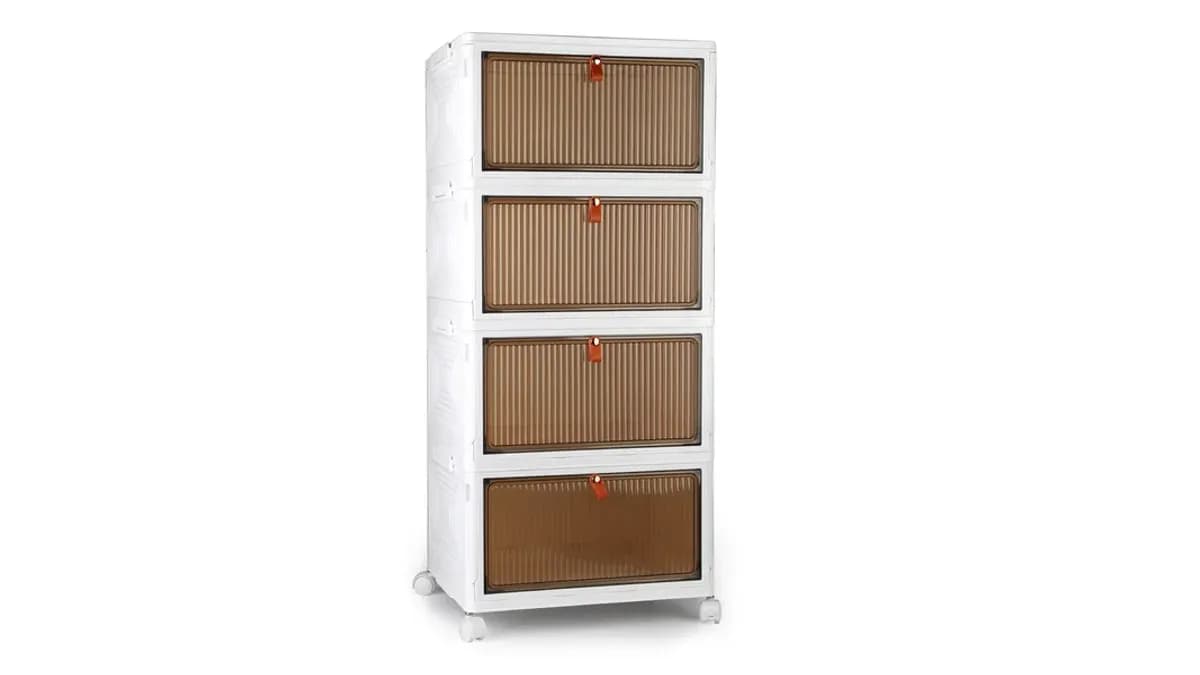
The best craft room storage cabinets hide the visual noise of supplies while keeping them easy to reach. Choose closed cabinets with adjustable shelves for bulky supplies, drawer cabinets for small and flat items, a rolling cabinet for projects in progress, and wall cabinets or open shelving above for things you use daily. Inside every cabinet, sort supplies into labeled bins by craft, and anchor any tall cabinet to the wall.
A craft room fills up fast. Paper, fabric, yarn, paint, tools and half-finished projects all compete for space, and open shelves quickly look chaotic. Cabinets solve that by putting a door or drawer front between you and the clutter. This guide compares the main types of craft room storage cabinets, explains what to store in each, shows how to organize the inside so supplies stay findable, and covers the layout and safety steps that make a cabinet system work in a spare room, a closet or a corner of another room.
Types of Craft Room Storage Cabinets Compared
Each cabinet type suits a different kind of supply. Most craft rooms use two or three types together.
| Cabinet type | Best for | Strengths | Watch out for |
|---|---|---|---|
| Tall cabinet with doors | Bulky supplies, fabric bins, paper boxes | Hides a large volume of supplies | Must be anchored to the wall |
| Drawer cabinet (flat or multi-drawer) | Paper, stencils, small tools, embellishments | Flat storage, items easy to see from above | Deep drawers turn into jumbles without dividers |
| Rolling cabinet or cart with drawers | Active projects, tools you move around | Moves to the table or out of the way | Lock wheels while working |
| Base cabinet with countertop | Work surface plus storage below | Doubles as a cutting or work station | Needs enough knee or standing room |
| Wall-mounted cabinet | Daily tools, paints, small items | Uses wall space above the work surface | Must be mounted into studs or with proper anchors |
| Glass-front display cabinet | Yarn, ribbons, finished pieces | Shows color at a glance while staying dust-free | Sunlight can fade fabric and yarn |
| Folding stackable cabinet | Small rooms, renters, temporary setups | No tools needed, folds away | Lighter load capacity than solid furniture |
If you are buying furniture for the whole room, our craft room storage furniture buying guide covers tables, carts and seating alongside cabinets.
Start With an Inventory, Not a Cabinet
The most common mistake is buying cabinets before knowing what needs to fit. Gather every craft supply in the house in one spot, then sort it into groups:
- By craft: sewing, paper crafts, painting, knitting and crochet, jewelry making, kids' crafts. 2. By size: bulky (fabric, yarn, foam), flat (paper, stencils, patterns), small (beads, buttons, embellishments) and tools. 3. By frequency: used weekly, used monthly, used for seasonal or occasional projects.
Measure the volume of each group roughly by counting how many bins or boxes it fills. That number tells you how much cabinet space you need and which type fits each group. For a full room plan, our guide on how to plan a craft storage room walks through zoning before buying.
What to Store in Each Cabinet
Matching supplies to cabinet types keeps everything findable. Use this plan as a starting point.
| Supply | Best cabinet | Inside the cabinet |
|---|---|---|
| Fabric and fat quarters | Tall cabinet with adjustable shelves | Fold around comic boards or in clear bins by color |
| Yarn | Tall cabinet or glass-front cabinet | Bins or cubbies by weight and color |
| Scrapbook and cardstock paper | Flat drawer cabinet | Sorted by size and color in flat folders |
| Paints and brushes | Wall cabinet or drawer cabinet | Upright in caddies, lids closed tightly |
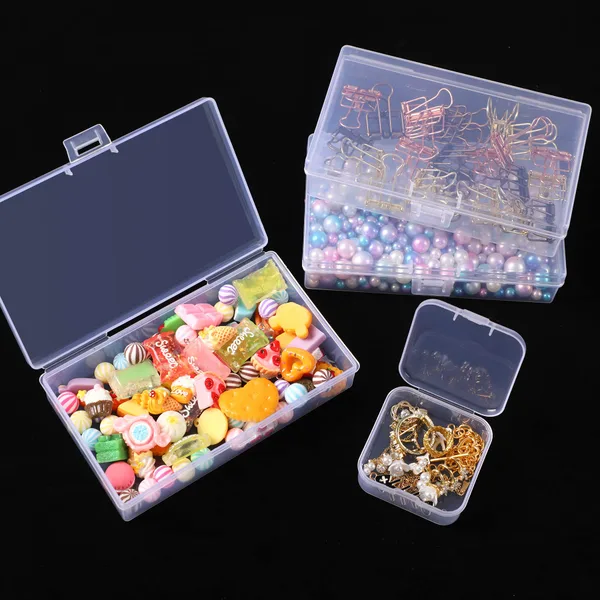
| Beads, buttons, embellishments | Drawer cabinet | Small clear boxes inside drawers |
| Cutting tools and rulers | Drawer cabinet or wall cabinet | Dividers or hooks, sharp items secured |
| Current projects | Rolling cabinet | One drawer or bin per project |
| Seasonal and occasional supplies | Top shelves of tall cabinets | Labeled lidded bins |
Organize the Inside of Each Cabinet
A cabinet with doors can hide a mess just as easily as it hides clutter. These habits keep the inside as tidy as the outside.
- Use bins on every shelf. Bins act like drawers on a shelf. Pull one out, take what you need and slide it back. - One craft per bin. A bin of mixed supplies becomes a junk drawer. Keep sewing in one, paper tools in another. - Choose clear bins or label the front. You should know what is inside without opening the bin. Our storage bin labels guide covers simple label formats, and you can download sheets from our free printable storage bin labels collection. - Adjust shelf heights to the bins. Leave a little space above each bin so it slides out without scraping. - Put heavy bins low. Fabric and yarn are light, but paper stacks, paint and tools add up. Keep the heaviest bins on the lowest shelves. ## Small Supplies: Drawers and Mini Boxes
Small items are where craft rooms lose the most time. Drawer cabinets keep beads, buttons, sequins, brads and charms visible from above. Inside each drawer, use small clear boxes or dividers so different items never share the same space.
Label the drawer front with its category, such as "Buttons" or "Jewelry findings", and keep the most-used drawers between waist and eye height.
Rolling Cabinets for Projects in Progress
A rolling cabinet earns its place in almost every craft room. It keeps active projects together and moves to the work table when you start, then rolls into a corner or closet when you stop.
The folding storage cabinet with wheels is one example of a lightweight option. It measures 15.35 x 11.02 x 33.07 inches with the wheels attached, has four bins with front doors and a total capacity of 76 quarts (19 quarts per bin), assembles with tool-free snap buckles and folds flat when you do not need it.
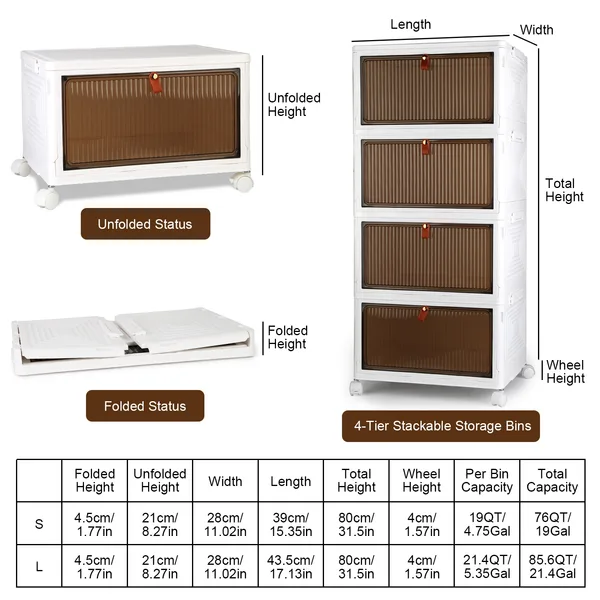
Assign one tier to each project or each craft. Because each tier has its own front door, you can reach a project without unstacking the cabinet.
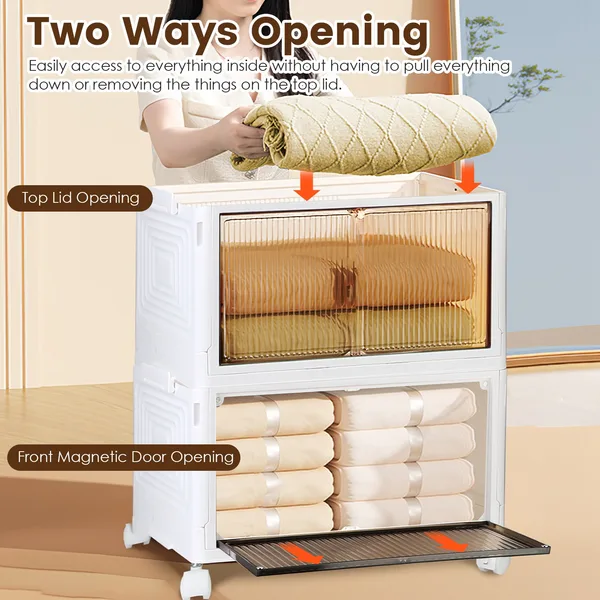
The front-opening design shown above with blankets works the same way for fabric, yarn or batting. Lock the wheels while you work so the cabinet does not roll as you open the doors.
Use the Wall Above the Cabinets
Base cabinets and tall cabinets cover the floor, but the wall above a work table is prime space for daily tools. Mount a wall cabinet, a pegboard or a rail system above the work surface for scissors, rulers, tape, thread and paints you reach for every session. Pegboards let you move hooks as your tools change. Our guide to home office wall organization systems compares pegboards, rails and grids, and pegboard garage organization has more hook layouts that adapt well to a craft room.
Layout Tips for Craft Room Cabinets
Where you put cabinets matters as much as which ones you buy. Use these layout rules to keep the room comfortable to work in.
- Keep the work surface central. Cabinets go around the edges of the room, with the table where light is best. 2. Store supplies by zone. Put sewing supplies near the sewing machine, paper near the cutting area and paints near a washable surface. 3. Leave walkway space. Make sure doors and drawers can open fully without hitting the table or chair. 4. Use tall cabinets on the wall with no window, so they do not block light. 5. Keep the most-used supplies within reach of your seat. A rolling cabinet beside the chair is often enough.
If your craft space is a closet rather than a full room, our craft closet organization ideas show how to fit cabinets, shelves and a fold-down work surface into a small footprint.
Safety Basics for Tall Cabinets
Tall cabinets filled with supplies can be top-heavy, especially when the doors are open or a drawer is pulled out. The US Consumer Product Safety Commission's Anchor It campaign says that anchoring all furniture with drawers, doors and shelves to the wall prevents tip-over injuries and deaths. Its basic steps are to attach a bracket to the wall, move the furniture close, attach a bracket to the furniture, connect the strap and tighten it.
Other simple precautions:
- Store heavy items on the lowest shelves. - Open only one drawer at a time on tall drawer cabinets. - Keep sharp tools such as rotary cutters, craft knives and needles in closed drawers, especially if children use the room. - Follow the label on paints, glues and sprays for storage temperature and ventilation.
For kids' art supplies in a shared room, our playroom storage ideas cover low cabinets that children can use on their own.
Choosing Cabinet Materials and Features
Once you know which cabinet types you need, look closely at how each one is built. A few features make a big difference in daily use.
- Adjustable shelves. Craft supplies change over time. Shelves that move let you fit a new bin size or a sewing machine without buying another cabinet. - Full-extension drawers. Drawers that pull all the way out let you see the back row of beads or paper without reaching blindly. - Solid backs and sides. A cabinet with a solid back keeps dust and pet hair off fabric and yarn, and it is easier to anchor securely. - Doors that open wide. Check that doors open far enough to slide bins out without hitting the hinge side. - Washable surfaces. Laminate, painted wood and plastic are easy to wipe after paint, glue or glitter spills. - Locking casters on rolling pieces. Wheels should lock firmly so the cabinet stays put while you work.
Before you buy, compare the cabinet's interior dimensions with the bins you already own. Many people find that a cabinet looks large from the outside but fits one bin fewer per shelf than expected once the door frame and hinges are counted.
Budget Ideas for Craft Room Cabinets
You do not need custom cabinetry to get a tidy craft room.
- Repurpose kitchen or garage cabinets. Basic base cabinets make a sturdy work counter with storage below. - Combine a bookcase with doors. Many bookcases accept add-on doors or bins that act like drawers. - Use folding stackable cabinets for renters or temporary spaces. Many assemble without tools, as the steps below show.
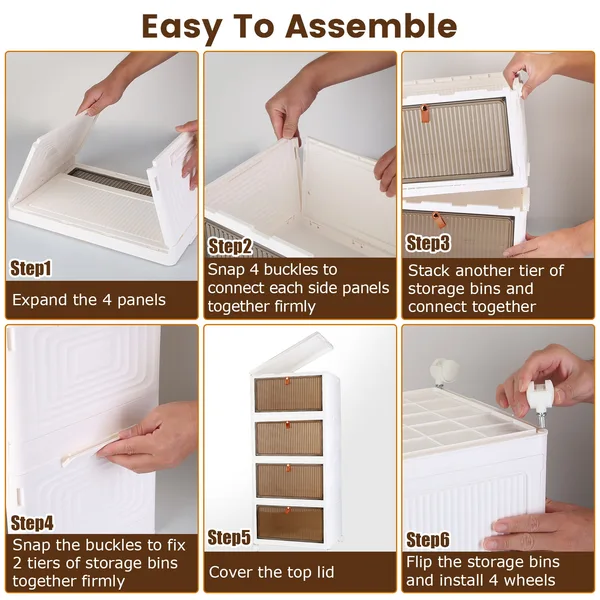
- Add bins before buying more furniture. Often the problem is the inside of a cabinet, not the number of cabinets.
For more low-cost ideas, see our craft storage room ideas and the yarn storage ideas guide for fiber crafts.
Frequently Asked Questions
What type of cabinet is best for a craft room?
Most craft rooms need a mix: tall cabinets with doors for bulky supplies, drawer cabinets for small and flat items, and a rolling cabinet for projects in progress. Choose based on what you store most, after sorting your supplies.
How do I organize craft supplies inside cabinets?
Put bins on every shelf, keep one craft per bin, label each bin on the front and put the heaviest bins on the lowest shelves. Adjust shelf heights so bins slide in and out easily.
Should craft room cabinets have doors or open shelves?
Doors hide visual clutter and keep dust off supplies, which suits bulky or mixed items. Open shelves work for things you use daily or want to see, such as yarn by color. Many craft rooms use doors below and open shelves or pegboards above.
How do I store paper in a craft room?
Store paper flat in a drawer cabinet or in flat folders on a shelf, sorted by size and color. Flat storage keeps paper from curling or bending at the edges.
Do craft room cabinets need to be anchored to the wall?
Tall cabinets and any cabinet with drawers, doors or shelves should be anchored. The US Consumer Product Safety Commission's Anchor It campaign says anchoring this type of furniture to the wall prevents tip-over injuries and deaths.
How can I add craft storage in a small room?
Use vertical space with tall anchored cabinets and wall storage above the work surface, choose a rolling cabinet that tucks away, and consider folding cabinets that collapse when not in use.
What should go in a rolling craft cabinet?
Projects in progress and the tools you move between workspaces. Assign one drawer or tier per project so everything for that project stays together.
How do I keep craft cabinets organized long term?
Return supplies to their bin at the end of each session, reset the room weekly and review bins each season to remove dried-out paint, broken tools and supplies you no longer use.
Final Thoughts
Craft room storage cabinets work best when they match the supplies you actually own. Sort first, choose tall cabinets for bulky items, drawers for small and flat items and a rolling cabinet for active projects, then organize the inside with labeled bins. Anchor tall pieces, use the wall above your table for daily tools and keep a weekly reset habit. For a complete room plan, read our craft room organization guide.
Liked this guide?
Get new organizing guides and the occasional new product by email. No spam, unsubscribe anytime.
Related articles
Explore more articles
- Best Desk Organizers for a Productive Work Desk
- Linen Closet Organization Ideas: 25 Smart Ways to Transform Your Storage Space in 2026
- 25 Creative Wall to Wall Shelf Ideas That Transform Your Home Storage in 2026
- Stainless Steel Racks: Long-Term Investment for Home Organization
- Rice Food Storage Containers: Ultimate Guide to Fresh Rice Storage in 2026
- Pretty Food Storage Containers: Transform Your Kitchen with Stylish Organization Solutions 2026
- 25+ Creative Organization Ideas for Pantry: Transform Your Kitchen Storage in 2026
- Pyrex Food Storage Containers: Complete Review & Buying Guide for 2026