
Holiday Decoration Storage Hacks: How to Pack Ornaments, Lights and Garland
Holiday decoration storage hacks for ornaments, string lights, garland and small parts: how to sort by job, which containers to use, where to store the bins and a January pack-up routine.
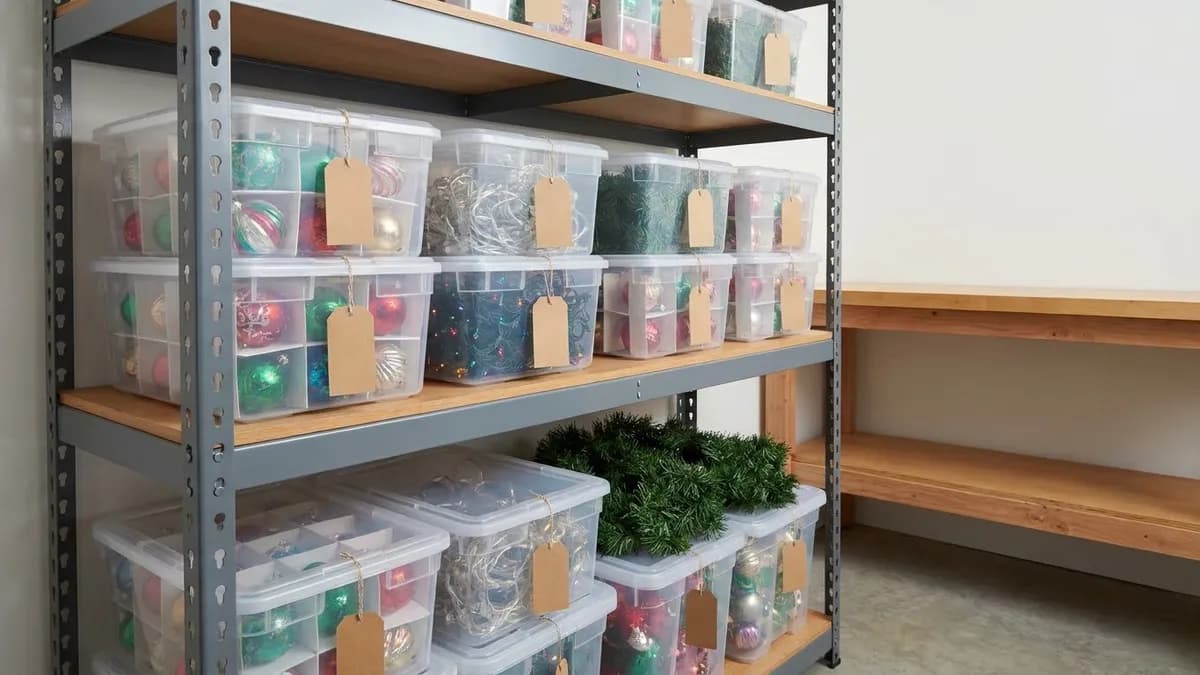
The best holiday decoration storage hacks are simple: sort decorations by job before they go into storage, give fragile ornaments divided boxes, wind every light strand flat around a piece of cardboard, use clear lidded bins you can read from the outside, and keep a small "first out" bin with hooks, cords and tape on top of the stack. Store everything in a cool, dry spot you can reach without moving the whole garage.
Mid-November is when most households pull the decoration bins down. It is also the best moment to fix the system, because you can see exactly what broke, tangled or went missing last year. This guide covers how to sort decorations, the storage hacks that protect ornaments and lights, where to keep the bins, and a simple routine for packing everything away in January so next year's setup takes an afternoon instead of a weekend.
Holiday Decoration Storage Hacks at a Glance
Use this table to match each type of decoration with the container and the hack that keeps it safe. Most homes need four to six bins in total, not twenty.
| Decoration | Best container | Storage hack | Common mistake |
|---|---|---|---|
| Glass and fragile ornaments | Divided box with a lid | One ornament per compartment, heavy ones at the bottom | Loose ornaments wrapped in tissue in a deep tote |
| String lights | Flat cardboard wrap inside a bin | Test, wind flat, tape the plug end | Balling lights up in a bag |
| Garland and wreaths | Wide fabric bin or wreath bag | Coil loosely, store on top so nothing crushes it | Stuffing it into a small box |
| Stockings, tree skirts, linens | Fabric bin or vacuum bag | Wash or air out first, then fold loosely | Storing them damp |
| Small parts (hooks, clips, timers) | Small clear snap boxes | One box per item type, packed in the first-out bin | Loose in the bottom of a tote |
| Tabletop and village pieces | Original box or padded bin | Photograph the layout before packing | Mixing them with ornaments |
Sort Decorations by Job, Not by Room
Most decoration chaos comes from packing whatever is closest into whichever bin is open. A better rule is to group items by how they need to be handled. Fragile items need padding, lights need untangling protection, soft items need dryness, and small parts need to be findable.
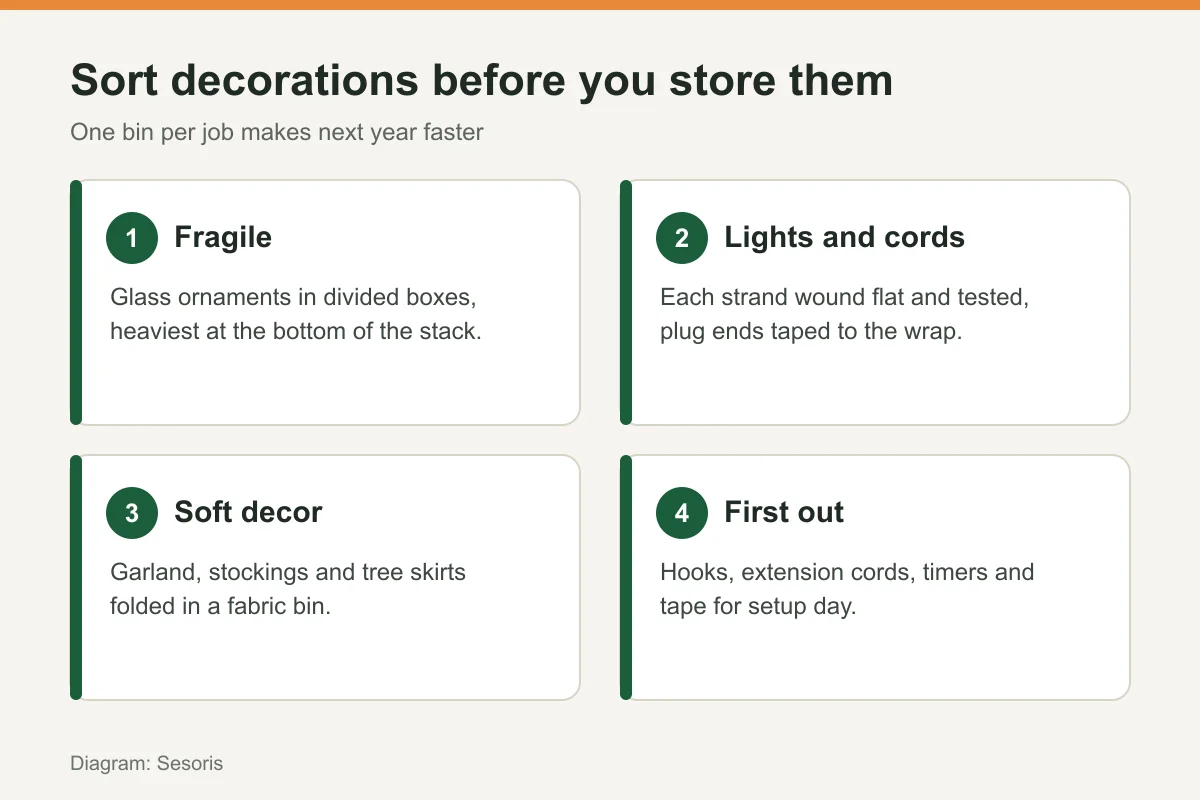
- Fragile. Glass ornaments, ceramic pieces and anything that chips. 2. Lights and cords. Every string of lights, extension cords, timers and remotes. 3. Soft decor. Garland, stockings, tree skirts, pillow covers and table runners. 4. First out. The handful of things you need on setup day before anything else: ornament hooks, cord clips, a timer, tape, scissors and a spare bulb kit.
Before you sort, set aside anything broken, faded or unused for two seasons. Our guide to decluttering home decor has a simple keep, donate or toss method that works well for decorations, and the declutter your house checklist helps if the bins are only one part of a bigger cleanup.
Hack 1: Give Every Ornament Its Own Compartment
Ornaments break when they touch each other. A divided box with a lid solves that without any tissue paper. Put one ornament in each compartment, store the heaviest ones in the bottom layer and stack lighter layers on top.
You do not need a box sold specifically for ornaments. A fabric storage box with movable dividers and a clear zip-top lid, such as our 16-compartment storage box (17 x 17 x 12.4 inches), works the same way. Adjust the dividers so each slot fits snugly, and the clear lid lets you see which ornaments are inside without opening it.
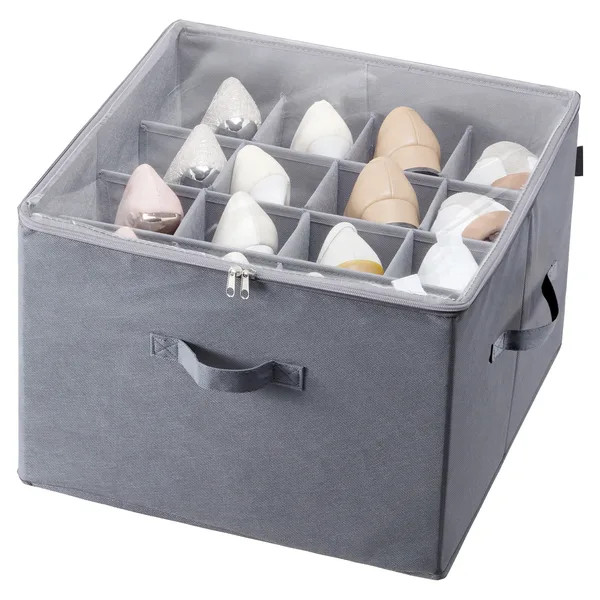
For very small or delicate pieces, egg cartons and small cups also work as dividers inside a larger bin. Whatever you use, write the contents on a tag on two sides of the box so you can read it from any angle on a shelf.
Hack 2: Wind Lights Flat Around Cardboard
Tangled lights waste more setup time than anything else. Before you put them away, plug each strand in once and replace any dead bulbs, then unplug it and check the cord for cracks or exposed wire. Throw away any strand with a damaged cord instead of storing it for next year.
Then cut a rectangle of sturdy cardboard about the size of a sheet of paper, notch one short edge, slide the plug end into the notch and wind the strand around the board in flat, even loops. Tape the other end down and write the length or the room it belongs to on the board.
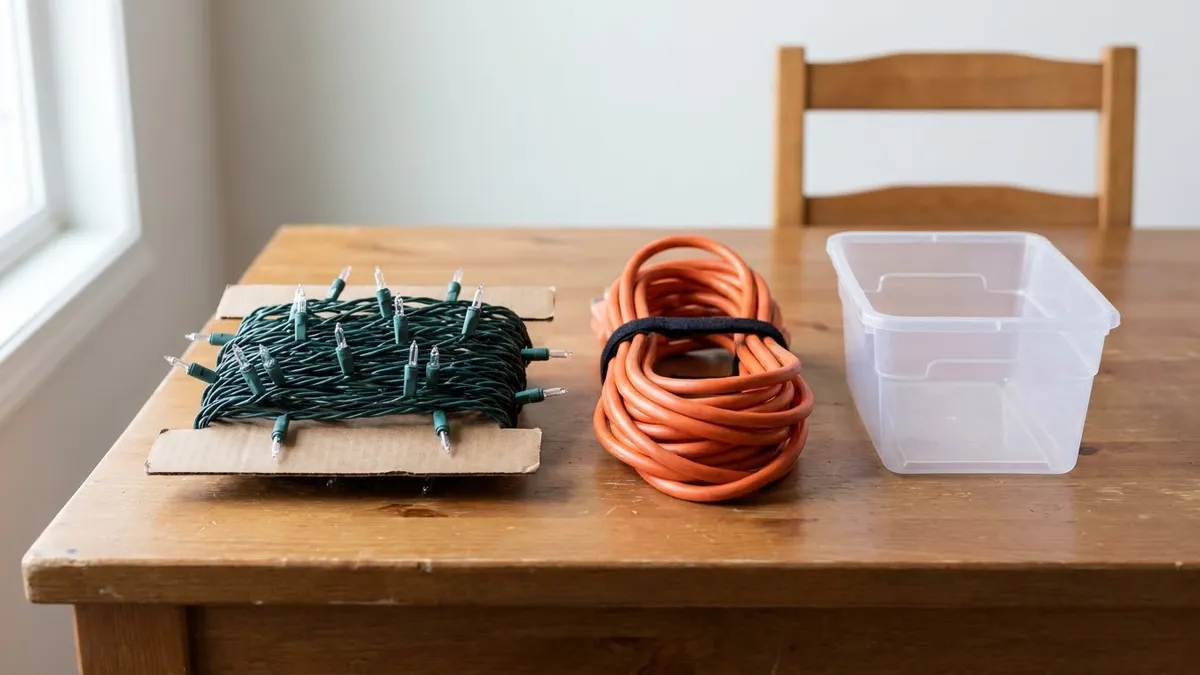
- Wind outdoor and indoor lights on separate boards so you never hang an indoor strand outside. - Coil extension cords loosely and secure them with a hook-and-loop strap rather than knotting them. - Keep timers and remotes in a small labeled box in the first-out bin, not loose in the lights bin. - Store light boards standing on their edge so the strands are not crushed under heavy items.
Hack 3: Use Small Clear Boxes for Tiny Parts
Ornament hooks, spare bulbs, fuses, cord clips and the tiny pieces of a tabletop village are the first things to disappear. Small clear snap boxes keep each type separate and visible. Our clear plastic storage boxes come in two sizes, 5.11 x 3.14 x 1.18 inches and 2.16 x 2.16 x 0.78 inches, with hinged snap lids that stay closed if the box is turned over in a bin.
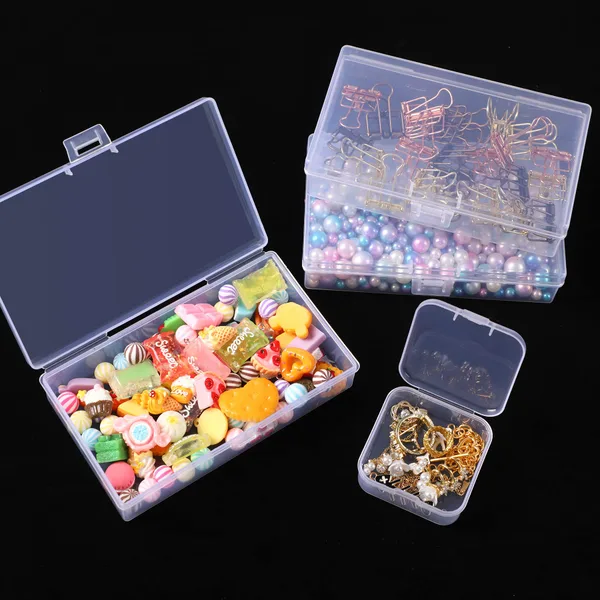
Put all the small boxes together in the first-out bin. On setup day, that one bin gives you hooks for the tree, clips for the gutters and fresh bulbs for any strand that flickers.
Hack 4: Clear Bins, Matching Lids and Visible Labels
Opaque totes in different sizes are hard to stack and harder to search. Switch gradually to clear bins with matching lids in one or two sizes. You can see what is inside, the stack stays stable, and a label on the short end tells you the contents when the bin sits on a shelf.
Label by group and by room, for example "Fragile, tree ornaments" or "Lights, porch". Number the bins and keep a short list on your phone of what is in each number. When someone asks where the stockings are, you check the list instead of opening six boxes.
Where to Store Holiday Decorations
The right spot depends on your home, but the best places share three traits: they stay dry, they do not swing between very hot and very cold, and you can reach them without moving everything else.
| Location | Works well for | Watch out for | Tip |
|---|---|---|---|
| Basement shelving | Most bins, especially heavy ones | Dampness near the floor | Keep bins on shelves, not directly on concrete |
| Garage shelves | Outdoor decor, lights, sturdy plastic items | Heat and cold swings | Avoid storing candles or delicate glass here |
| Closet shelf or under-stairs closet | Fragile ornaments and soft decor | Limited height | Use the top shelf for light bins |
| Under the bed | Flat items, wrapping supplies, tree skirts | Dust | Choose bins with zip or snap lids |
| Attic | Lightweight, non-fragile items | Temperature extremes | Leave delicate and heat-sensitive items elsewhere |
If your bins currently live on the garage floor, our guides to basement storage ideas, best garage storage solutions and under-stairs closet storage show shelving setups that free up space. For flat items, the under-bed storage containers review compares lid styles and sizes.
Hack 5: Pack a First-Out Bin and a Last-In Bin
Two special bins make the whole season smoother. The first-out bin holds everything you need before anything else on setup day: hooks, extension cords, timers, tape, scissors, spare bulbs and a small tool kit. Put it on top of the stack or at the front of the shelf.
The last-in bin is empty when you take decorations out. Use it to store the everyday decor you swap out for the season, such as throw pillows, a regular wreath or table centerpieces. When the holidays end, the decorations go back into their bins and your everyday items come out of this one, so nothing ends up homeless on a counter for weeks.
A Simple Routine for Packing Up in January
Most of the work of next year's setup happens when you pack up. Give yourself one afternoon and follow the same order every year.
- Take photos of the tree, mantel and tabletop displays before you take anything down. 2. Test lights while they are still hung, and toss any strand that no longer works. 3. Gather by group on a clear table: fragile, lights, soft and small parts. 4. Clean and dry stockings, linens and tree skirts before folding them. 5. Pack by group, heaviest at the bottom of each bin. 6. Label and number each bin, and update the list on your phone. 7. Return everyday decor from the last-in bin and store the empty bins nested together.
This routine pairs well with the seasonal tasks in our winter home maintenance checklist, and if you bake for the holidays, our holiday cookie storage containers and kitchen wrap organizer ideas guides cover the kitchen side of the season. For decorating ideas once everything is unpacked, see holiday home decor ideas.
Common Holiday Storage Mistakes
- Storing decorations damp. Garland, wreaths and fabric items that go into a bin damp can grow mildew by next year. - Overfilling bins. A bin that needs to be forced shut crushes what is inside and cracks the lid. - Mixing fragile and heavy items. A ceramic piece on top of glass ornaments is how breakage happens. - Keeping everything. Broken, faded and unused items take up shelf space that could hold what you love. - Hiding the first-out bin. If the hooks and cords are at the bottom of the stack, setup starts with unpacking everything.
Frequently Asked Questions
What is the best way to store Christmas ornaments?
Store each ornament in its own compartment inside a lidded box, with the heaviest ornaments in the bottom layer. Divided boxes, egg cartons or a storage box with movable dividers all work. Label the box on two sides and keep it on a shelf where nothing heavy sits on top.
How do I keep Christmas lights from tangling?
Test each strand, then wind it flat around a notched piece of cardboard, starting with the plug end tucked into the notch. Tape the far end down and label the board. Store the boards on their edge inside a bin so they are not crushed.
Is it okay to store holiday decorations in the garage?
Sturdy items such as plastic outdoor decor and light boards usually handle a garage well if they sit on shelves in sealed bins. Avoid storing candles, delicate glass and anything heat-sensitive there, because many garages get very hot in summer and cold in winter.
Are clear bins better than opaque totes for decorations?
For most homes, yes. Clear bins let you see the contents without opening them, which saves time on setup day. Opaque bins are useful only for items that fade in light, such as some fabrics, and only if they are clearly labeled.
How many storage bins do I need for holiday decorations?
Most households manage with four to six: one or two for fragile ornaments, one for lights and cords, one for soft decor, one first-out bin and one last-in bin for the everyday decor you swap out. Start with what you own and add bins only when a group clearly needs more room.
How should I store artificial wreaths and garland?
Coil garland loosely and store it in a wide fabric bin or bag on top of the stack so nothing presses on it. Hang wreaths on a hook in a closet or keep them in a round wreath bag. Make sure both are completely dry before you pack them away.
When should I organize my holiday decoration storage?
The easiest time is when you pack up in January, because you can see what broke and what you did not use. A quick check in mid-November, when the bins come down, lets you replace damaged lights and missing hooks before decorating starts.
What should go in a first-out bin?
Everything you need before decorating starts: ornament hooks, extension cords, outlet timers, tape, scissors, cord clips, spare bulbs and fuses, and a small tool kit. Keep it on top of the stack so it is the first thing you open.
Final Thoughts
Good holiday decoration storage is less about buying special containers and more about a few habits: sort by job, protect each ornament and light strand, label clear bins on the outside and keep a first-out bin on top. Spend one afternoon setting this up when you pack away this season, and next November your decorations will come out in order, ready to hang.
Liked this guide?
Get new organizing guides and the occasional new product by email. No spam, unsubscribe anytime.
Related articles


Explore more articles
- Modular vs Fixed Storage: Which System Fits Your Space?
- Sunday Reset Routine: The Lifestyle Habit That Transforms Your Entire Week in 2026
- How to Plan a Craft Storage Room That Actually Works: A Practical 2026 Guide
- Laundry Room Organization Tips That Actually Work in 2026
- Best Storage Food Containers: Complete 2026 Review & Buying Guide for a Fresher, More Organized Kitchen
- 30+ Best Kitchen Organizer Ideas to Transform Your Cooking Space in 2026
- Top Rated Glass Food Storage Containers: Ultimate Buyer's Guide for 2026
- Organization Laundry Room: 30+ Smart Tips to Transform Your Space in 2026