
Kitchen Wrap Organizer Ideas: Drawers, Doors and Racks for Foil, Wrap and Bags
Kitchen wrap organizer ideas for foil, plastic wrap, parchment and zip bags: where each one belongs, nine drawer, door and pantry setups, how to measure and the food storage habits that make it work.
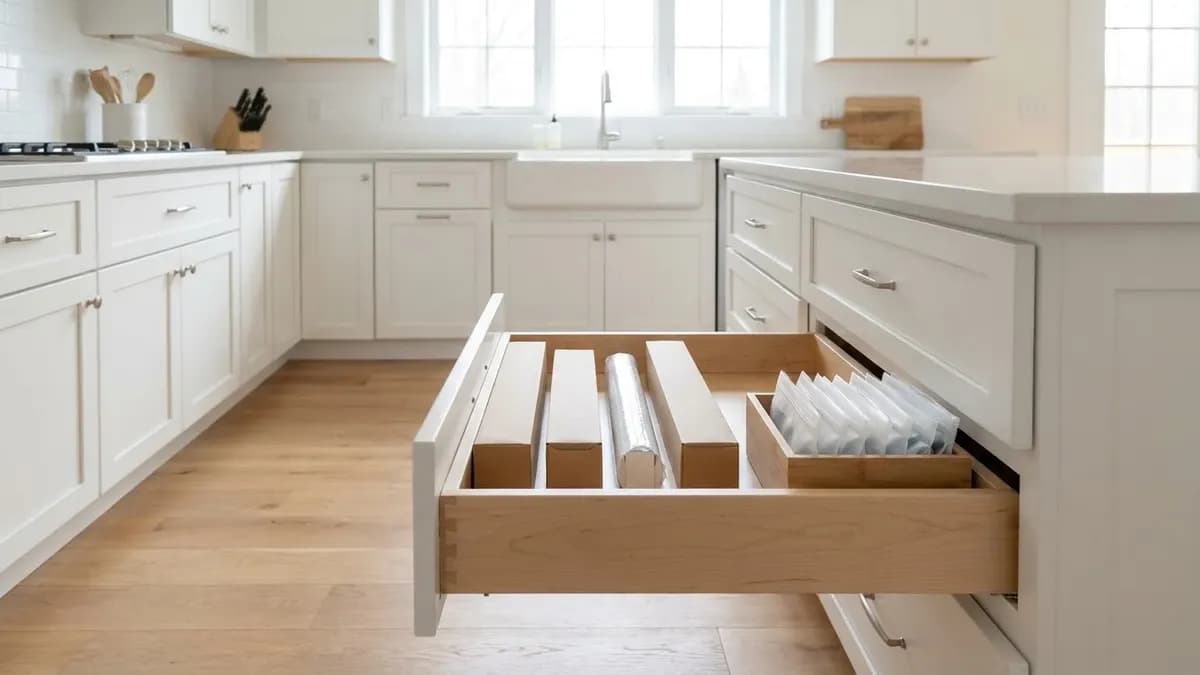
The best kitchen wrap organizer ideas keep foil, plastic wrap, parchment and zip bags in one spot close to where you pack food. Stand the boxes upright in a drawer divider, move the rolls you use less often to a rack inside a cabinet door, sort bags by size in a shallow bin, and keep refills on a pantry shelf instead of in the daily drawer. Measure your boxes and your drawer before buying anything.
Kitchen wraps are a small category that causes a lot of daily friction. The boxes are long and narrow, so they slide around loose drawers, tip over in cabinets and end up stacked three deep, with the one you need always at the bottom. November makes the problem worse: holiday baking, leftovers and food gifts all use more foil, parchment and bags than a normal month. This guide covers where each type of wrap belongs, nine organizer ideas for drawers, doors and pantries, how to measure so things actually fit, and the food storage habits that make the system worth having.
Kitchen Wrap Organizer Ideas at a Glance
Start with this comparison. Each idea solves a different problem, and most kitchens end up using two or three of them together: one daily spot for the wraps you reach for every day, one overflow spot for less frequent rolls and one backup spot for bulk refills.
| Idea | Best for | Space needed | Install |
|---|---|---|---|
| Upright boxes in a drawer divider | Daily foil, plastic wrap, parchment | A drawer at least as deep as your longest box | None |
| Shallow bag drawer with size bins | Zip bags in 3 to 4 sizes | Shallow drawer or one bin | None |
| Rack inside a cabinet door | Weekly rolls such as wax or freezer paper | Clearance between door and shelf | Screws or adhesive |
| Over-the-door pantry rack | Bulk refills and backups | A pantry or closet door | Hooks over the door |
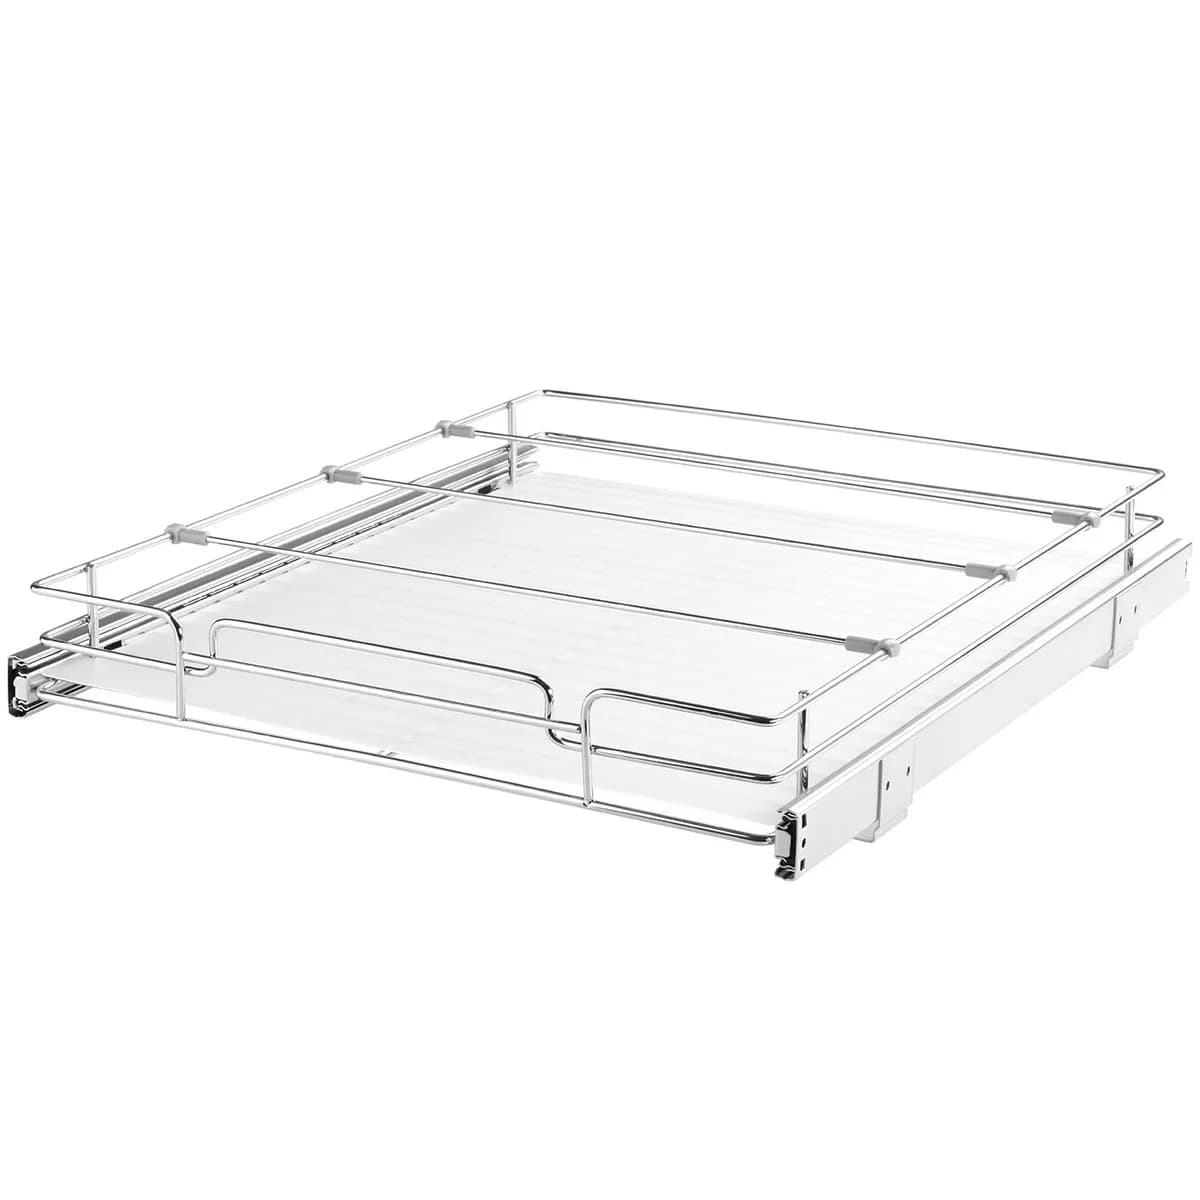
| Slide-out cabinet drawer | Wraps stored in a base cabinet | A cabinet floor and side clearance | Adhesive or screws |
| Wall or side-of-cabinet mount | Kitchens with no free drawer | A flat wall or cabinet side | Screws or adhesive |
| Magazine file on its side | Renters, quick fix inside a cabinet | One shelf | None |
| Tension rod under the sink | Spare rolls you rarely use | Under-sink cabinet | None |
| Labeled backup bin | Bulk club-store packs | Pantry shelf | None |
The rest of this guide goes through each idea, starting with the daily drawer because that is where most of the time is saved.
Pick the Right Home for Each Wrap
Before buying an organizer, sort your wraps by how often you use them. Pull every box, roll and bag out of the drawers and cabinets and put them on the counter. Most families find duplicates: two half-used rolls of foil, three boxes of sandwich bags and a parchment roll from last year's baking that was never put back where it came from.
Group what is left into three piles. Daily items are the ones you use most days, usually foil, plastic wrap and one or two bag sizes. Weekly items are things like parchment for baking, wax paper and freezer paper. Backups are the unopened refills and bulk packs. The daily pile gets the best spot in the kitchen, the weekly pile gets the second-best spot, and the backups go to the pantry.
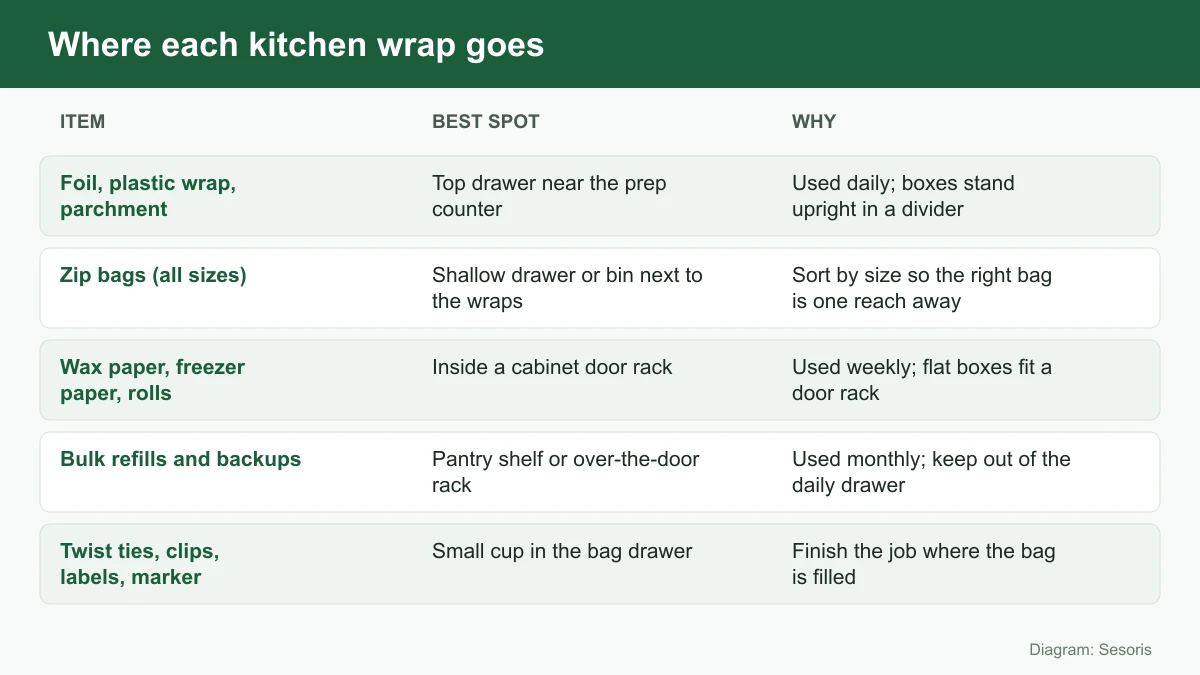
Location matters more than the organizer itself. The daily drawer should sit between the place you prep food and the refrigerator, because that is the path leftovers take. If you have to walk to the other side of the kitchen to grab foil, the boxes will end up on the counter instead of in the drawer.
Idea 1: Stand Boxes Upright in a Drawer Divider
The most useful setup for daily wraps is a drawer where the boxes stand on their long edge, side by side, like books on a shelf. You see every box at once, you can pull one out without lifting the others, and the cutting edge faces up so you can tear a sheet without taking the box out at all.
This works in any drawer that is at least as long as your longest box, front to back or side to side. Standard rolls of foil and plastic wrap come in boxes a little longer than the roll width, so measure the box you actually buy instead of assuming. A simple wooden or bamboo divider insert keeps the boxes from leaning, and an expandable divider adjusts if you change brands later.
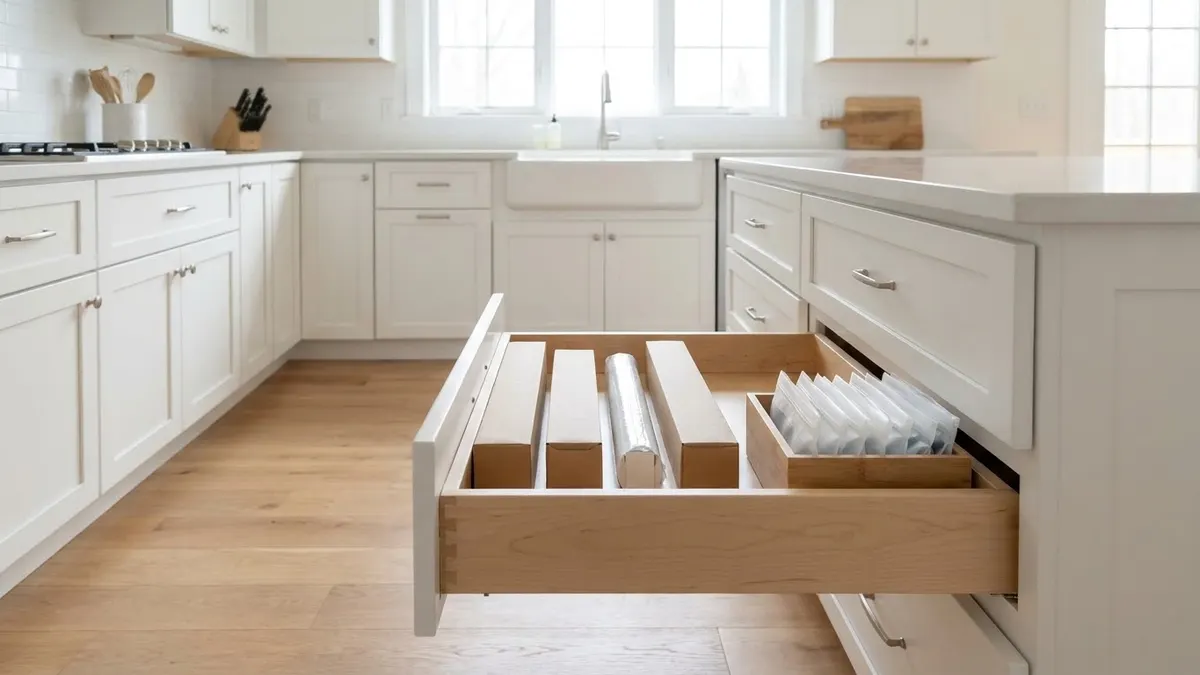
If your drawers are shallow, lay the boxes flat in a single layer instead of stacking them. Stacked boxes are the main reason wrap drawers fall apart: the bottom box gets crushed, the top one slides, and nobody puts things back in order. One layer, one box per slot, is easier to keep up for months.
Idea 2: Give Zip Bags Their Own Shallow Drawer
Bags take up less height than wrap boxes but more floor space, because most households keep three or four sizes. Snack, sandwich, quart and gallon bags all look similar in the drawer, and it is easy to grab the wrong size with wet hands. A shallow drawer with a clear divider tray solves this: one compartment per size, boxes lying flat with the open end facing you.
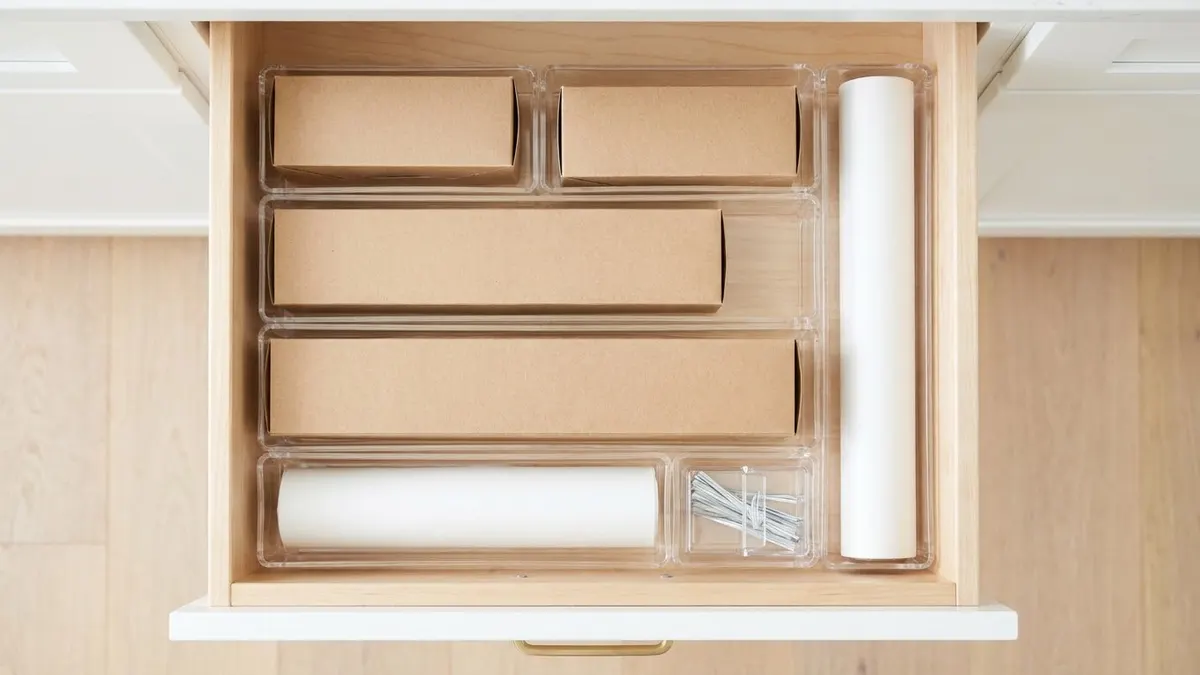
Many people take the bags out of their cardboard boxes entirely and stand them in a bin, which saves space but makes it harder to see the size. If you do that, label each section of the bin with the size. A small cup in the same drawer for twist ties, bag clips, freezer labels and a permanent marker means you can fill, seal and date a bag without opening a second drawer.
If you are short on drawers, our deep kitchen drawer organizer ideas cover how to split one deep drawer into two levels, and the kitchen drawer organizer ideas guide has more layouts for utensils and tools that often compete for the same space.
Idea 3: Mount a Rack Inside a Cabinet Door
The back of a base cabinet door is wasted space in most kitchens. A slim rack mounted there can hold two or three flat boxes, which makes it a good home for weekly items like parchment, wax paper and freezer paper. The boxes lie horizontally, and you open the door, tear what you need and close it again.
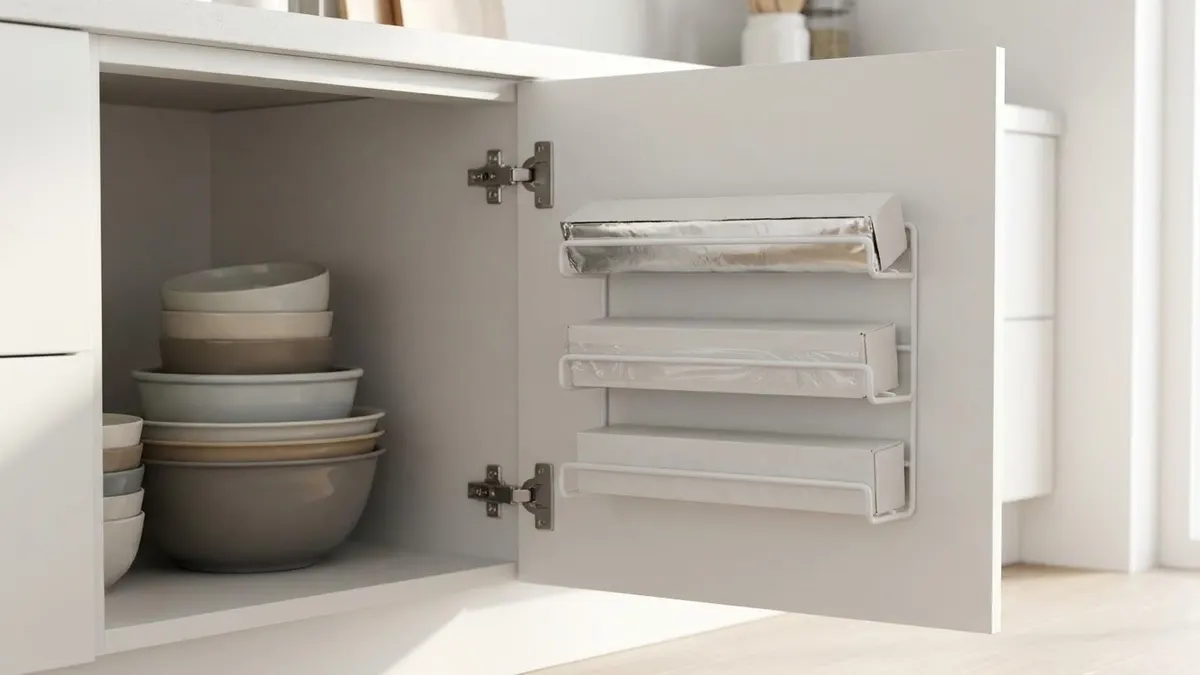
Check two measurements before you buy. First, the inside width of the door between the hinges, since the rack has to clear them. Second, the gap between the closed door and the front edge of the shelf inside. If the boxes stick out past that gap, the door will not close. Racks that screw in hold heavier boxes, while adhesive mounts suit renters and lighter rolls.
Idea 4: Use an Over-the-Door Pantry Rack for Refills
Bulk packs from warehouse stores are good value but awkward to store. A pantry door rack keeps them visible and off the shelves where food goes. Our Over-the-Door Pantry Organizer, 8 Tier has eight wire baskets, each 16 in. wide and 4.9 in. deep, with adjustable spacing, which fits a long box of foil or plastic wrap lying flat.
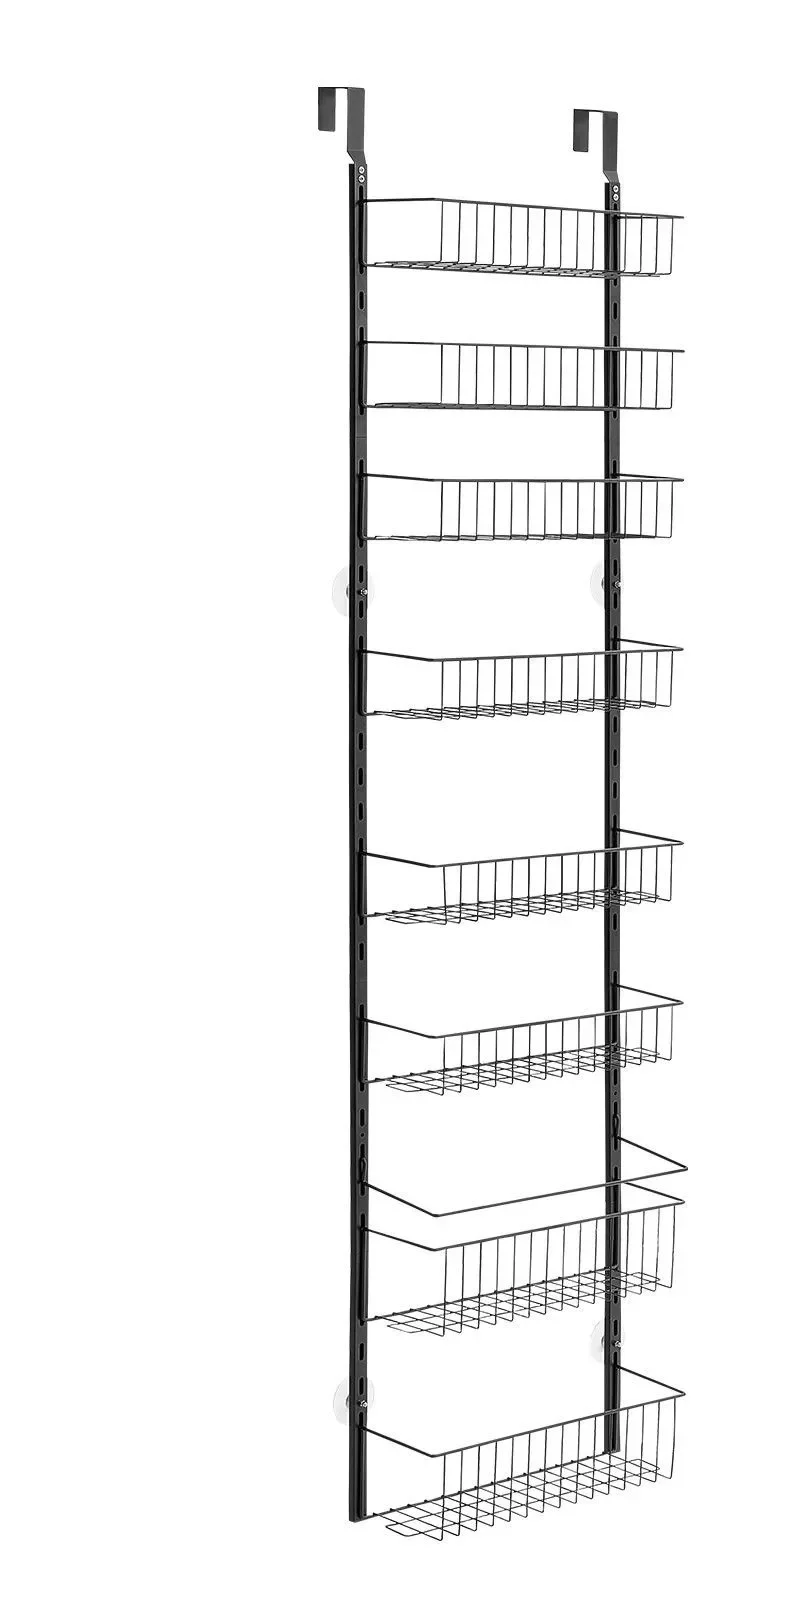
Read the fit limits for any door rack before loading it. This one fits doors up to 2 in. thick, needs at least 7.1 in. of clearance between the door and any shelves behind it, and holds 26.5 lb in total with up to 3.31 lb per basket. Rolls are light, so weight is rarely the problem, but clearance often is. Put the heaviest packs on the lowest baskets and keep one basket for bags of the same size so you can see when you are running low.
For more pantry setups, see our pull out pantry organization ideas and the pantry organization containers buying guide.
Idea 5: Add a Slide-Out Drawer to a Base Cabinet
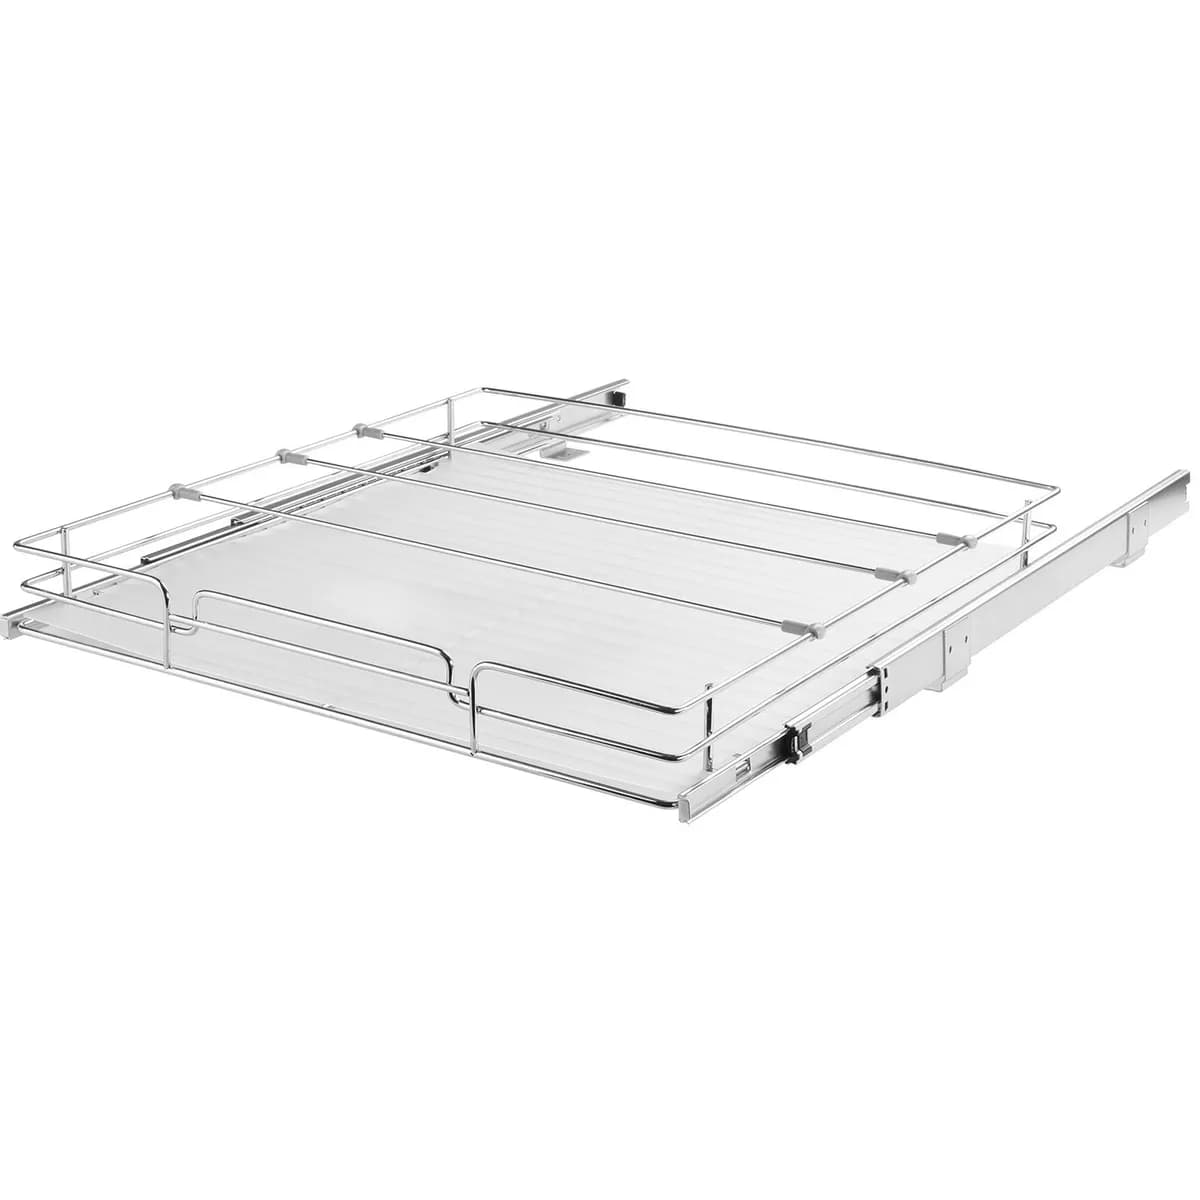
If your drawers are full, a base cabinet can become a wrap drawer. A slide-out tray turns the cabinet floor into a pull-out shelf, so boxes at the back come to you instead of disappearing behind pots. Our Slide-Out Cabinet Drawer, Black Steel measures 11.81 x 16.92 x 3.15 in., pulls out up to 13 in. and mounts with adhesive tape, so no drilling is needed.
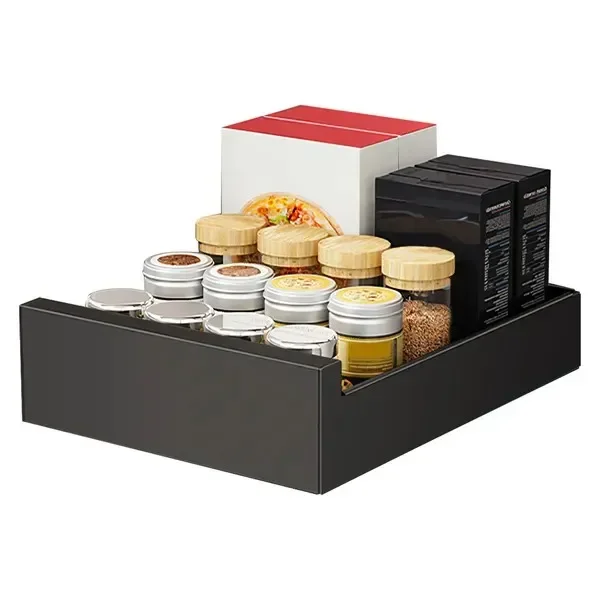
Lay wrap boxes along the 16.92 in. length so the cutting edges face the front. Check the length of your own boxes first, and measure the cabinet opening at its narrowest point, which is usually between the hinges or the face frame. If the cabinet is under the sink, keep the tray away from the drain and any leaks; a 2-tier pull-out under-sink organizer is shaped to work around the pipes. Our corner cabinet kitchen ideas cover the awkward cabinets that are harder to reach.
Ideas 6 to 9: Quick Fixes for Small Kitchens
Not every kitchen has a free drawer or a pantry door. These four smaller ideas fill the gaps:
- Mount a holder on the side of a cabinet or wall. A wall-mounted wrap holder near the prep counter works when every drawer is taken. Keep it away from the stove so the boxes do not sit next to heat. 2. Turn a magazine file on its side. In an upper cabinet, a plain magazine file laid on its side holds two or three boxes and slides out like a drawer. This is a renter-friendly fix that needs no tools. 3. Hang a tension rod under the sink. A rod across the under-sink cabinet can hold spare rolls that you use rarely. Keep paper products away from any drips. 4. Use one labeled backup bin. A single bin on a pantry shelf, labeled "wrap refills", stops backups from spreading across the kitchen and tells you at a glance when to restock.
If your kitchen is very small, our how to organize kitchen cabinets step by step tutorial helps you decide what earns cabinet space in the first place.
Measure Before You Buy
Most organizer returns happen because the boxes are longer than the drawer or the rack is wider than the door. Take three measurements and write them down before you shop:
| Measure | Where | Why it matters |
|---|---|---|
| Longest wrap box | End to end, including the lid flap | Sets the minimum drawer or rack length |
| Inside drawer length and depth | Inside the drawer box, not the drawer front | The box must fit with room to lift it out |
| Door clearance | Gap between the closed door and the shelf edge inside | Decides whether a door rack lets the door close |
| Hinge-to-hinge width | Inside the door, between the hinges | A door rack must clear both hinges |
Add about half an inch to the box length when you compare it to the drawer, so you can lift the box out without scraping. If you keep different widths, such as a standard roll and a wider heavy-duty roll, measure the widest one and plan the space around it.
Food Storage Habits That Make the System Work
An organized wrap drawer is only useful if leftovers actually get wrapped and put away on time. The FDA's food storage guidance says never to let food that needs refrigeration sit at room temperature for more than two hours, or one hour if the air temperature is above 90°F. Having foil, wrap and bags in one reachable drawer removes the small delay that leaves food on the counter after dinner.
The same FDA guidance recommends storing refrigerated foods in covered containers or sealed storage bags and keeping the refrigerator at or below 40°F (4°C). It also explains that freezer burn happens when food is not securely wrapped in airtight packaging, and that freezer burn is a quality issue, not a safety one. That is a good reason to keep freezer paper and gallon freezer bags together, so wrapping for the freezer is as easy as wrapping for the fridge.
Two habits help every system last:
- Date everything that goes into the freezer. Keep a permanent marker and labels in the bag drawer so the date goes on before the bag goes in. - Do not overcrowd the fridge. The FDA notes that air needs to circulate, so wrapped leftovers in flat bags or stackable containers keep shelves usable.
For containers instead of wraps, our comparison of glass vs plastic vs stainless steel food storage containers helps you decide which leftovers belong in a container and which belong in a bag.
A Holiday Wrap Station for November and December
The holidays put extra pressure on the wrap drawer. Cookie trays need parchment, leftovers need foil and bags, and food gifts need wrap that looks presentable. Set up a temporary holiday station for the season: one bin with parchment, foil, gallon bags, cookie tins, labels and a marker, placed near the oven or the baking counter.
When the season ends, put the extras back into the backup bin and return the daily drawer to normal. Our holiday cookie storage containers guide covers what to use for baked goods that need to stay fresh for gifting, and the winter home maintenance checklist includes the seasonal storage swap that pairs well with a kitchen reset.
Common Mistakes With Kitchen Wrap Storage
- Stacking boxes several deep. The bottom box always gets crushed. Use one layer or stand boxes upright. - Keeping refills in the daily drawer. Backups crowd out the boxes you use. Move them to the pantry. - Buying an organizer before measuring. Long boxes and door clearance are the usual reasons things do not fit. - Storing wraps next to the stove. Heat and grease are hard on cardboard boxes; choose a spot near prep, not near the burners. - Mixing bag sizes in one pile. Sort by size so the right bag is one reach away.
If the wrap drawer has become a catch-all for rubber bands and takeout menus too, start with our how to organize a junk drawer tutorial, then rebuild the wrap drawer on a clean slate. Spice storage often competes for the same drawers; the how to organize a spice drawer guide shows how to keep the two separate.
Frequently Asked Questions
What is the best way to organize foil and plastic wrap?
Stand the boxes upright on their long edge in a drawer divider, side by side, with the cutting edge facing up. You see every box at once and can tear a sheet without taking the box out. If your drawers are shallow, lay the boxes flat in a single layer instead of stacking them.
Where should I store kitchen wraps if I have no free drawers?
Use the back of a base cabinet door, a wall-mounted holder near the prep counter, or a magazine file turned on its side inside an upper cabinet. Keep the spot away from the stove, and measure the door clearance before mounting anything on a cabinet door.
How do I organize zip bags of different sizes?
Give bags a shallow drawer or bin with one compartment per size, with boxes lying flat and the open end facing you. If you remove the bags from their boxes, label each section with the size so nobody grabs the wrong one.
Will an over-the-door rack hold boxes of foil and plastic wrap?
Usually yes, as long as the baskets are wider than the box. Our over-the-door pantry organizer has baskets 16 in. wide and 4.9 in. deep, fits doors up to 2 in. thick and needs 7.1 in. of clearance behind the door. Always check the clearance before loading the rack.
What should I measure before buying a wrap organizer?
Measure the longest wrap box end to end, the inside length and depth of the drawer, the gap between the closed cabinet door and the shelf edge, and the width between the hinges. Add about half an inch to the box length so you can lift it out easily.
How long can leftovers sit out before I wrap them?
The FDA says food that needs refrigeration should not sit at room temperature for more than two hours, or one hour if the air temperature is above 90°F. Keeping wraps and bags close to the prep counter makes it easier to put food away in time.
Does wrapping food tightly prevent freezer burn?
The FDA explains that freezer burn happens when food is not securely wrapped in airtight packaging, and that it affects quality, not safety. Wrapping tightly and using freezer bags with the air pressed out helps keep frozen food tasting better.
Should I keep spare rolls in the same drawer?
No. Keep only the boxes you are using in the daily drawer and move unopened refills to a labeled backup bin or a pantry door rack. This keeps the daily drawer uncluttered and shows you when it is time to restock.
Final Thoughts
Kitchen wrap organizer ideas work best as a small system rather than one product: a daily drawer with upright boxes near the prep counter, a bag drawer sorted by size, a door rack or slide-out tray for weekly rolls and a pantry spot for refills. Measure your boxes, your drawers and your door clearance first, then pick the organizers that fit. With everything in one place, wrapping leftovers takes seconds, and the drawer stays tidy through the busiest cooking weeks of the year.
Liked this guide?
Get new organizing guides and the occasional new product by email. No spam, unsubscribe anytime.
Related articles
Explore more articles
- How to Organize Your Bedroom Closet Step by Step: Complete Tutorial for a Tidy, Functional Wardrobe in 2026
- Bamboo vs Plastic Storage: Which Material Fits Your Home?
- Lidded Box vs Open Basket Storage: Which Keeps Items Easier to Use?
- Morning Routine Organization: How a Structured Start Transforms Your Entire Day in 2026
- Best Garage Storage Solutions: A Source-Backed Practical Guide for 2026
- How to Choose and Install Shelf on Wall Ideas That Actually Work in 2026
- Laundry Room Organization Tips That Actually Work in 2026
- Bathroom Storage Solutions: The Complete 2026 Tutorial Guide to a Tidy, Organized Bathroom